


LIMPIEZA PERIODICA
De vez en cuando deberá inspeccionar
y limpiar el interior y exterior de la
pistola para quitarle los residuos de
pintura y acumulaciones de polvo.
1. Examine los orificios de la tapa de
aire y la boquilla. Si están obstruídos,
quítele los anillos en O y sumerja la
tapa de aire o la boquilla en
solvente.
2. Puede utilizar un cepillo, palillo u
otro objeto similar para sacar la
pintura seca de los orificios o ductos.
NUNCA USE OBJETOS DE METAL
PARA LIMPIAR DUCTOS
TALADRADOS A PRESICION. SI
ESTOS SE DAÑAN PODRIA
AFECTAR EL ROCIO.
3. Desconecte y revise la aguja de ajuste
para ver si está muy desgastada o
torcida.
IMPORTANTE: Si el extremo de la
aguja está más desgastado en un lado,
la aguja está torcida o la pistola está
desalineada debido a un golpe o una
caida. Si la pistola está torcida no podrá
repararla. Para probar la aguja,
deslicéla sobre una superficie plana.
Reemplácela si es necesario.
4. Chequée y reemplace los anillos y sellos
dañados. Éstos se pueden limpiar pero
no los debe sumerjir en solvente.
5. Sáquele las tuercas que sostienen los
empaques y reemplácelos SOLO si no
puede eliminar la fuga de material
después de apretar las tuercas. No
apriete demasiado estas tuercas ya
que podría restringir el movimiento
de la aguja.
6. Ensamble las piezas en orden
contrario a lo anterior y use aceite sin
silicón en las piezas movibles.
Aplíquele Vaselina o grasa liviana a
las conexiones con roscas y a las de
las mangueras.
PARA ALMACENAR
1. Cuando no vaya a usar la pistola
pulverizadora, gire la perilla de
control de fluído en sentido
contrario a las agujas del reloj para
reducir la tensión del resorte sobre
la aguja.
2. La pistola pulverizadora DEBE estar
bien limpia y ligeramente lubricada.
3. Turn fluid control knob fully clockwise
until closed.
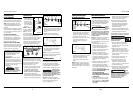
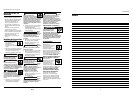
4. With gun 8” away from surface,
trigger a short, one second burst
while turning fluid control knob
counterclockwise. Observe the spray
pattern on the target and adjust the
fluid control knob until the desired
pattern (atomization) is obtained
(See Figure 5).
If the spray is too fine (excessive
overspray), caused by too much air for
the amount of paint being sprayed,
reduce the air pressure or open the
fluid control to spray more material.
3. Fill the canister about 3/4 full with
material and start the air
compressor. Be sure the hose(s) is
long enough to allow a full
movement of the gun across the
surface to be painted.
4. Be sure that the air pressure
regulator is set for the proper
operation of the gun. Refer to the
specifications section. Air pressure
should be checked at the spray gun
inlet with the trigger pulled.
5. Set up a piece of cardboard or other
scrap material to use as a target and
adjust for best spray pattern.
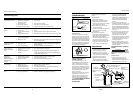
MATERIAL & PATTERN
ADJUSTMENTS
Always test spray
gun on scrap
material to avoid damage to
workpiece.
MODEL KBS530
1. Adjust air pressure to the spray gun
according to the recommendations
supplied with the spray material.
This air pressure usually falls
between 30-50 PSI.
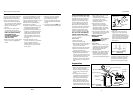
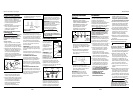
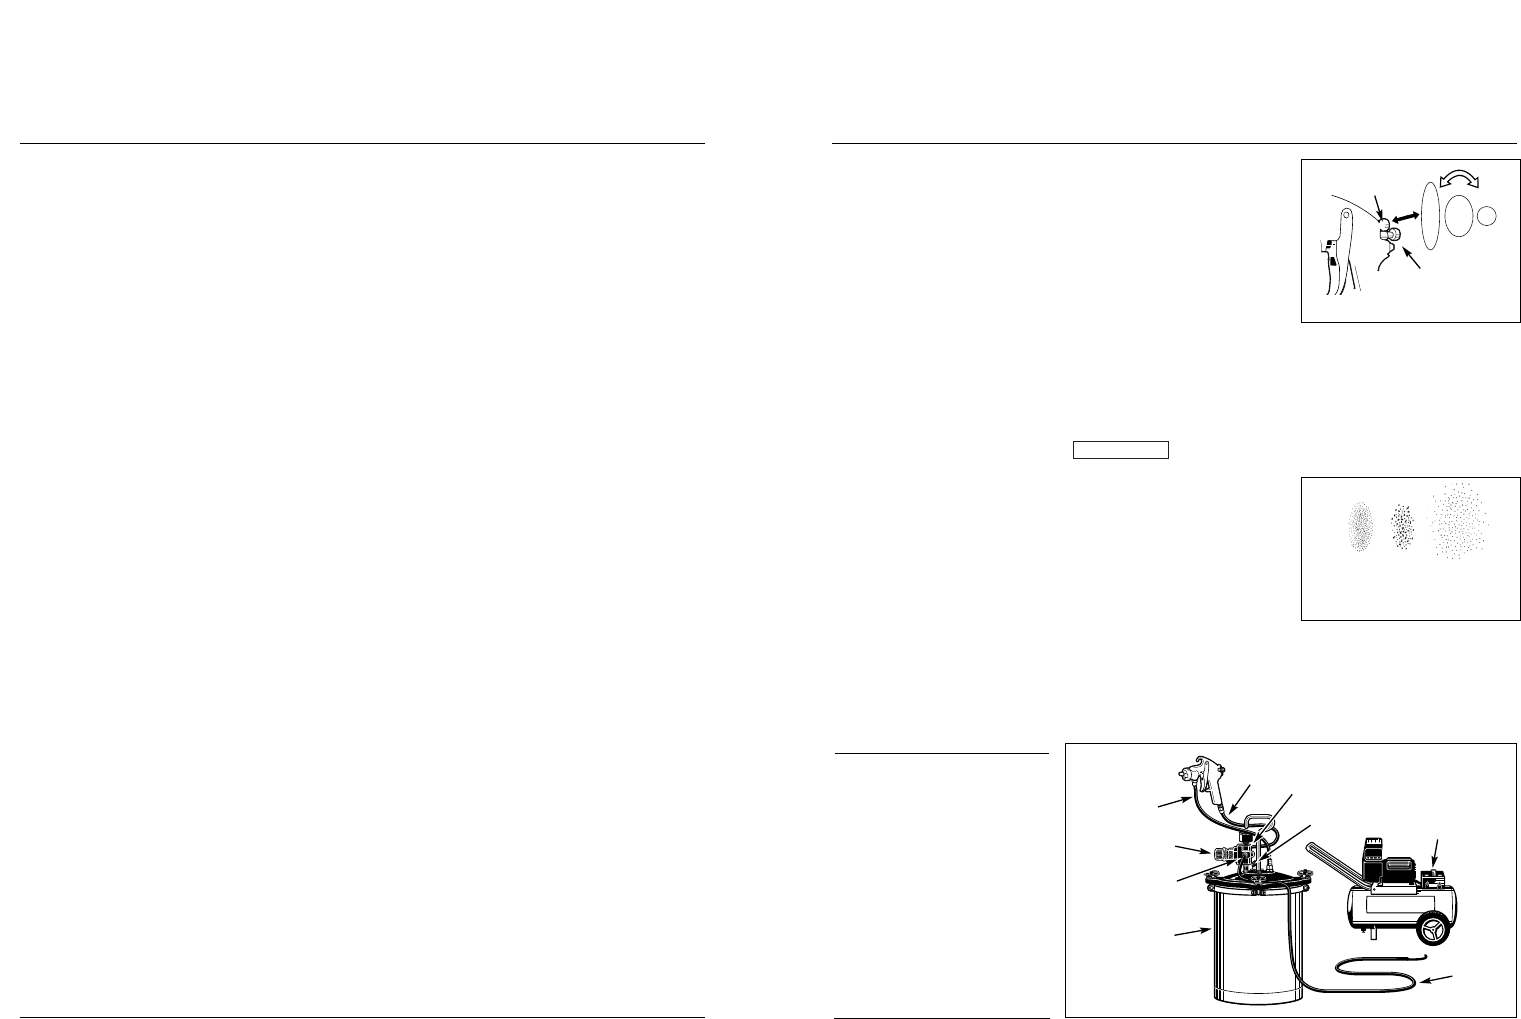
2. Set pattern size to desired shape. For
full pattern, open pattern control
knob by turning counterclockwise.
For a round pattern, turn pattern
control knob clockwise (See Figure 4).
NOTICE
3
22 Sp
Pistola Pulverización de Uso General
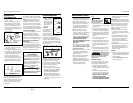
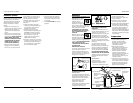
USING A PRESSURIZED PAINT TANK
The spray gun in this manual is readily
adaptable for use with a pressurized
paint tank. This allows continuous
spraying of large quantities of paint
without stopping. It also allows the
gun to be used while being held in
ANY position without spilling paint.
The proper connections to make when
using a pressurized paint tank are as
illustrated in Figure 3. Refer to the
instructions supplied with the paint
tank for connections and usage. DO
NOT USE A PAINT TANK WITHOUT
READING THOSE INSTRUCTIONS.
Prepare the spray gun for use with the
paint tank as follows:
MODEL KBS530
1. Remove the canister.
2. Unscrew the material tube.
3. After the tube is removed, locate the
brass locknut and remove the nut
using a 14 mm hex socket.
4. Remove the canister top and gasket.
5. Attach the material hose from the
paint tank to the spray gun.
6. Pressure/siphon valve knob must be
tightened clockwise (S direction)
when using a pressurized paint tank
connected as shown in Figure 3. This
will prevent pressurized air from
escaping out of the canister pressure
valve port when the canister is not
used.
Preparation
MATERIAL PREPARATION
1. Before using desired material in the
spray gun, spray a compatible
thinner or solvent through the gun
to remove any contaminants and
residue.
2. Thoroughly mix the material in
accordance with the manufacturer’s
instructions. If necessary, thin per
paint manufacturer’s instructions.
Strain material through a paint
strainer. Test the consistency of the
material by making a few strokes on
a cardboard target. Be sure the spray
material is clean and free from lumps.
Figure 3 - Paint Tank
Connections
Paint Tank Regulator
Safety Valve
Air Hose
Paint Tank
Material Hose
Air Hose
High - Out To Spray Gun
High - In from
compressor
Air Source
Regulator
Model KBS530
Figure 4 - Pattern Size
Pattern
Control Knob
Fluid Control
Knob
Correct Paint Too
Thick
Paint
Too Thin
Figure 5 - Pattern Consistency
(Atomization)