


Funcionamiento
(Continuación)
3. La cantidad de pintura aplicada
puede variar según la velocidad del
movimiento, la distancia entre la
pistola y la superficie y los ajustes de
la perilla de control de fluído.
4. Los empates entre cada mano deben
ser suficientes para obtener un
acabado parejo al final (Vea la
Figura 9).
5. Use un pedazo de cartón como
protección para evitar que la pintura
caiga fuera del área que desea
cubrir. Si es necesario, use cinta
pegante (tirro) para cubrir otras
áreas.
NOTA: Dos manos de pintura no muy
espesas le darán mejores resultados y
menos posibilidades de que la pintura
se chorree que si usa una mano espesa
de pintura.
21 Sp
Mantenimiento
LIMPIEZA DIARIA
Los códigos locales tal vez le exijan que
utilice ciertos equipos y métodos de
limpieza. Siga los códigos locales y las
recomendaciones del fabricante para
el uso y el desecho de materiales
rociados y solventes.
Limpie la
pistola
pulverizadora inmediatamente después
de terminar de usarla. La pintura y
otros materiales se secan rápidamente
dentro de los ductos pequeños y ésta
se dañaría ya que sería muy dificil de
quitarle la pintara endurecida dentro
de dichos ductos.
NOTA: En las siguientes instrucciones,
la palabra “solvente” se refiere al
solvente adecuado para cada material
que haya usado (por ejemplo: thinner
para lacas, etc).
1. Las pistolas pulverizadoras con
envase—Desconecte el envase y
vacíelo, después enjuaguélo con un
solvente recomendado para la
pintura o material que haya usado.
2. Llene el envase de solvente y
conéctelo a la pistola. Rocíe el
solvente con la pistola y agítela con
fuerza al mismo tiempo. Limpie el
exterior de la pistola con un trapo
empapado de solvente. Repita estos
pasos hasta que la pistola esté
limpia.
3. Quítele la tapa de aire y remójela en
solvente para limpiarla. Use un
cepillo pequeño para quitarle las
manchas difíciles de sacar. Puede
usar palillos o cepillos pequeños para
limpiar los ductos de aire; sin
embargo, NUNCA USE OBJETOS DE
METAL PARA LIMPIAR LOS
DUCTOS QUE HAN SIDO
TALADRADOS CON PRECISION. SI
ESTOS SE DAÑAN EL ROCIO SERA
INADECUADO.
4. Limpie los empaques con un trapo
empapado en solvente. Para evitar
que el equipo se dañe, No sumerja
los empaques o la pistola en el
solvente.
AVISO
5. Después de usar agua para limpiar la
pistola cuando haya usado pinturas a
base de agua, rocíe aguarrás para
evitar que la pistola se oxide.
6. Use aceite sin silicón para lubricar
todas las piezas movibles antes de
ensamblar la pistola. Use Vaselina o
grasa liviana para lubricar todas las
conexiones con roscas antes de
almacenar la pistola.
7. Limpie bien la pistola para eliminar
todos los contaminantes que podrían
oxidar la pistola pulverizadora.
PARA LIMPIAR LA PISTOLA DESPUES DE
USARLA CON UN TANQUE DE PINTURA
Cierre el suministro de aire al
tanque y libere toda la
presión del tanque.
1. Abra el orificio de desfogue del
tanque de pintura. Si está usando
una tapa de aire de mezcla externa,
aflójela un poco.
2. Reduzca la presión de aire a 0,69 -
1,38 bar. Cúbrale los orificios a la
tapa de aire con un trapo y oprima el
gatillo. El aire se regresará a través
de la boquilla forzando a la pintura
hacia el tanque.
3. Vacíe el tanque y límpielo con un
trapo empapado en solvente.
4. Vierta suficiente solvente en el
tanque para limpiar a fondo la
manguera y la pistola. Cierre el
tanque y comience a rociar hasta que
el solvente salga limpio.
5. Desconecte la manguera de material
y séquela con aire comprimido para
sacarle los residuos de solvente.
Cuando
le
aplique aire comprimido a la manguera,
para secarla, cerciórese de mantenerla
alejada de cualquier persona para
evitar que le caigan residuos de
solvente en los ojos y la piel
ocasionandole heridas.
!
ADVERTENCIA
!
ADVERTENCIA
Operation
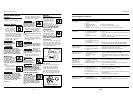
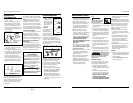
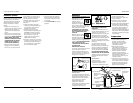
1. Begin spraying.
Always keep the
gun at right angles
to the work by
flexing your wrist
while making the
paint stroke. (See
Figure 6).
NOTE: Do not keep
the wrist stiff during
the stroke and do
not “fan” the gun
from side to side in
an arc while spraying. This type of
motion brings the gun close to the
surface and deposits a heavy concentra-
tion of material in the center of each
stroke and applies an insufficient
concentration of material at the end of
the stroke. This will make a very poor,
irregular paint job (See Figure 7).
Keep the nozzle about 6 to 9 inches from
the work surface throughout the stroke
and always keep the gun in motion while
spraying. Stopping gun movement in
mid-stroke will cause a build up of
material and result in “runs.”
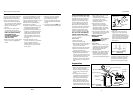
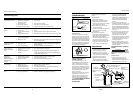
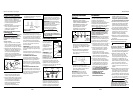
2. “Trigger” the gun properly. Start the
gun moving at the beginning of the
stroke BEFORE SQUEEZING THE
TRIGGER and release the trigger
BEFORE STOPPING GUN MOVEMENT
at the end of the stroke. This
procedure will “feather” (blend) each
stroke with the next without showing
overlap or unevenness (See Figure 8).
3. The amount of material being
applied can be varied by the speed of
the stroke, distance from the surface
and adjustment of the fluid control
knob.
4. Overlap strokes just enough to
obtain an even coat (See Figure 9).
5. Use a piece of cardboard as a shield
to catch overspray at the edges of
the work to protect other surfaces.
Use masking tape to cover other
areas if needed.
NOTE: Two thin coats of material will
yield better results and have less chance
of runs than one heavy layer.
Maintenance
DAILY CLEAN-UP
Local codes may require specific
cleaning methods and equipment.
Follow local codes and manufacturer’s
recommendations for the use and
disposal of spray materials and solvent.
Clean spray gun
immediately after
use. Paint and other materials dry
quickly in the small passages rendering
gun useless due to the difficulty of
removing hardened materials from the
passages inside the gun.
NOTE: In the instructions below,
“solvent” refers to the specific solvent
for the material used (eg: lacquer
thinner for lacquer, etc ).
NOTICE
Preparation
(Continued)
If the spray is too coarse (spitting globs),
reduce the amount of material with the
fluid control knob or thin the material.
NOTE: If there is sagging, too much
material is being applied. If there is an
“orange peel” effect, the material is
too thick.
Before spraying the workpiece, practice
a few minutes on a cardboard target to
ensure the pattern consistency and size
are set correctly.
DISTANCE ADJUSTMENTS
Start 6” away from work surface. If
pattern begins to run, move back an
inch and try again. The pattern will be
dry and thin and may feel rough if
sprayed from too far away.
SPEED OF STROKE ADJUSTMENTS
If speed of stroke is too slow, paint will
be wet on work surface and may run. If
speed of stroke is too fast, paint will be
dry and uneven on work surface.
4
General Purpose Spray Guns
Modelo KBS530
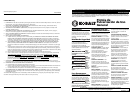
WATER/OIL IN COMPRESSED AIR
All compressor pumps discharge
some condensed water, oil or
contaminates with the
compressed air.
IMPORTANT: This condensation
will cause “fish eyes” to appear in
the paint job. Install appropriate
water/oil removal equipment (such
as filters and dryers) and controls as
necessary for the intended
application.
Failure to
install
appropriate water/oil removal
equipment may result in damage
to machinery or workpiece.
NOTICE
6 - 9”
Figure 6
Thin Coat Thin Coat
Heavy Coat
Figure 7
INCORRECT
6 - 9”
Pull
Trigger
Start
Stroke
Release
Trigger
End
Stroke
Figure 8
Figure 9
15,24 cm a
22,86cm
Oprima
el Gatillo
Comienzo
Suelte el
Gatillo
Final
Figura 8
Figura 9