


11 Sp
Manual de Instrucciones
Guía de Diagnóstico Averías
Problemas Posibles Causas Acciones a Tomar
La herramienta funciona
lentamente o no funciona
La herramienta expulsa
humedad
La herramienta no dispara el
remache
1. Hay impurezas en la
herramienta
2. La herramienta no
tiene aceite
3. Baja presión de aire
4. Fugas en la manguera
de aire
5. Baja la presión
1. Hay agua en el
tanque
2. Hay agua en las
líneas/mangueras de
aire
1. Las mordazas están
desgastadas
2. Las mordazas están
desajustadas
1. Limpie la herramienta con aceite para herramientas
neumaticas Campbell Hausfeld, solventes adecuados o una
mezcla de iguales proporciones de aceite para motores SAE
10 y queroseno. Si no utiliza aceite Campbell Hausfeld,
lubrique la herramienta después de limpiarla
2. Lubrique la herramienta segun las instrucciones de
lubricacion en la seccion denominada Pre-Operación
3. Ajuste el regulador del compresor al maximo permitido
para la herramienta mientras ésta funciona libremente
4. Apriete y selle las conexiones de la manguera, si consigue
fugas
5. Asegurese de que el tamaño de la manguera sea el
aprpiado. Las mangueras largas o las herramientas que
utilizan grandes volumenes de aire pueden requerir una
manguera con un D.I. de 12,7 mm (1/2”) o superior, según
la longitud total de la manguera
1. Vacíe el tanque (Vea el manual de compresor de aire).
Lubrique la herramienta y dejela funcionar hasta que no
expulse residuos de agua. Lubrique la herramienta una vez
más y oprima el gatillo
2a. Instale un separador/filtro de agua (PA2121). NOTA: Los
separadores funcionan debidamente solo cuando el flujo
de aire esta fresco. Ubique el separador/filtro lo más lejos
posible del compresor
2b. Instale un secador de aire
2c. Si el separador original no separa toda el agua presente en
el aire, instale un filtro de aire Campbell Hausfeld,
diseñado para colgárselo en la cintura (PA2121)
1. Reemplace las mordazas
2. Ajuste las mordazas de modo que la espiga del remache
calce adecuadamente (Vea la sección de Operación de este
manual)
Mantenimiento
(Continuación)
4. Mire dentro del pequeño diámetro
interior que está al fondo de la
cámara para revisar el nivel del
aceite hidráulico.
5. El nivel del aceite hidráulico debe
estar aproximadamente a 12,7 mm
(1/2") de la parte superior del
pequeño diámetro interior del
pistón (capacidad total: 60 - 70 cc).
ALMACENAMIENTO
La pistola remachadora debe lubricarse
antes de almacenarla. Siga las
instrucciones de lubricación excepto el
paso 4. Oprima el gatillo de la pistola
sólo una o dos veces, de modo que la
pistola tenga más aceite durante el
periodo de almacenamiento.
Información Sobre Piezas de
Repuesto
Para obtener información de como
obtener piezas de repuesto en Estados
Unidos, sírvase llamar al 1-800-543-
8622. En el exterior, comuníquese con
el distribuidor de productos Campbell
Hausfeld más cercano a su domicilio.
Suministre la siguiente información:
• Número del modelo
• Número del serial
• Número de pieza y descripción
Puede escribirnos a:
The Campbell Group
100 Production Drive
Harrison, OH 45030 U.S.A.
Pre-Operation
(Continued)
2. While pulling the trigger, pour a
teaspoon of Campbell Hausfeld oil
in the air inlet.
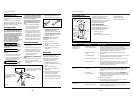
Cover exhaust port
with a towel
before applying air pressure. Oil will
discharge through the exhaust port
(Figure 3) during the first few seconds
of operation after an airtool has been
lubricated. Failure to cover exhaust
port can result in serious injury.
3. Release trigger and connect air tool
to air supply. Cover exhaust port
with a towel then run air tool for 10
to 20 cycles. Oil will discharge from
the exhaust port when air pressure
is applied. Continue to run rivet gun
until no oil is discharged. Wipe all
residual oil off of tool before use.
Operation
1. Size nose piece to appropriate rivet
shank diameter.
2. Place rivet shank into nose piece.
3. Squeeze trigger 1 to 2 times. Rivet
shank should break off.
4. Tilt tool back until shank falls into
safety cap.
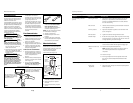
RIVET JAW ADJUSTMENT
1. Hold rivet gun with nose cap
pointing away from self. Remove
chrome nose cap (See Figure 1).
!
CAUTION
2
Operating Instructions
2. Use wrenches provided to loosen
jam nut on jaw housing (See
Figure 2).
3. Turn jaw counter-clockwise
making jaws tighten on rivet. Turn
clockwise to loosen jaws on rivet
(See Figure 1).
NOTE: Only turn jaw housing in 1/4
turn increments.
4. Tighten jam nut.
5. Reassemble chrome nose cap.
6. Check function of rivet in tool. Re-
adjust again if necessary.
Maintenance
HYDRAULIC CYLINDER
Occasionally, the hydraulic cylinder will
need hydraulic fluid. To fill the
hydraulic cylinder, follow the
procedure outlined below (See
Figure 3).
1. Release all system pressure and
disconnect the rivet gun.
2. Hold gun upside down.
3. Remove bottom plate and air
piston.
4. Look into small bore at bottom of
chamber to check hydraulic oil
level.
5. Hydraulic oil level should be about
1/2” from top of small piston bore
(total capacity: 60 - 70 cc).
STORAGE
The rivet gun must be lubricated
before storing. Follow the lubrication
instructions with the exception of step
4. Trigger the gun only once or twice
because more oil needs to remain in
the gun for storage.
Replacement Parts
Information
For information regarding where to
order replacement parts, call toll free
1-800-543-8622. Please provide the
following information:
• Model number
• Serial number
• Part number and description
Address parts correspondence to:
The Campbell Group
100 Production Drive
Harrison, OH 45030 U.S.A.
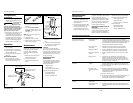
Figure 3
Figure 1
Figure 2
Chrome Nose Cap
Turn jaw counter-clockwise
to tighten jaws on rivet
Turn jaw clockwise to
loosen jaws on rivet
www.chpower.com
Bottom
Plate
Piston
Piston
Bore
Exhaust
Port
Hydraulic
Fluid Fill
Level
Safety Cap and
Frame Cap Nut