


duty cycle is exceeded. Do not switch
unit off. This will allow the internal fan
to cool the unit quickly. Welding
operations may continue when the red
lamp is no longer illuminated.
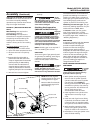
POLARITY (WG2160 AND WG2164
ONLY)
MIG welding wire requires the
electrode to be positive.
Flux welding wire requires the
electrode to be negative. Always use
the polarity recommended by the
welding wire manufacturer. The
welder is factory set for flux welding
wire.
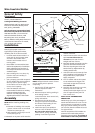
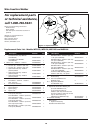
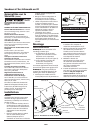
To Change Polarity
(See Figure 4)
1. Unplug power cord from socket.
2. Open wire feed compartment door.
3. Remove two nuts from polarity
studs.
4. Connect cable from drive deck to
positive stud and cable from work
clamp to negative stud for electrode
positive polarity for MIG welding.
Connect cable from drive deck to
negative stud and cable from work
clamp to positive stud for electrode
negative polarity for flux core welding.
5. Reinstall two nuts and tighten
The 75/25 mixture is recommended for
general steel welding. For aluminum
welding, use 100% argon. Cylinders of
either type gas may be obtained at your
local welding supply outlet. Secure
cylinder to prevent it from falling over.
Obtaining Correct Gas Type. The gas
used in any welding application for your
welder must be an INERT, NON-
FLAMMABLE TYPE. You can get the
type of gas needed from a nearby
welding gas distributor (often found in
the yellow pages under “Welders” or
“Welding Equipment”).
REGULATOR
A regulator is supplied with the WG2160
and WG2164 only. The regulator
provides a constant shielding gas
pressure and flow rate during the
welding process. Each regulator is
designed to be used with a specific gas or
mixture of gases. The argon and argon
mixture use the same thread type. The
100% carbon dioxide uses a different
thread type. An adapter is available at
your local welding gas supplier to
change between the two.
HOSE AND REGULATOR HOOKUP
PROCEDURE
Cylinder
gas is
under high pressure. Point cylinder
outlet away from yourself and any
bystanders before opening.
1. With cylinder securely supported,
stand on side of cylinder opposite
cylinder outlet then remove cylinder
cap and open valve slightly by
turning counterclockwise. When gas is
emitted from cylinder, close valve by
turning clockwise. This will blow out
dust or dirt that may have
accumulated around valve seat.
2. Install regulator onto cylinder valve.
Tighten stem nut securely to gas
valve.
3. Install one end of gas hose to fitting
on the back of welder and other end
of hose to fitting on regulator. Make
sure gas hose is not kinked or twisted.
4. While standing opposite cylinder
outlet, slowly open cylinder valve.
Inspect for leaks in the connections.
5. Remember to close gas cylinder valve
when finished welding.
5
www.chpower.com
securely.
If the
nuts are
not tightened properly, excessive heat
will be generated by the loose
connection and the insulators on the
studs will be damaged.
Shielding Gas Preparation
(WG2160 and WG2164 only)
Improper
handling
and maintenance of compressed gas
cylinders and regulators can result in
serious injury or death! Always secure
gas cylinders to a wall or other fixed
support to prevent cylinder from falling
over. Read, understand and follow all
compressed gas and equipment
warnings in the safety instructions.
NOTE: Shielding gas is not required if
flux-core welding wire is used.
GAS TYPES
There are 3 types of gas generally used
for gas metal arc welding; 100% argon,
a mixture of 75% argon and 25%
carbon dioxide (C25) or 100% carbon
dioxide.
Use ONLY
the type of gas recommended for your
welder. Use ONLY an inert, non-
flammable type of gas. Failure to do so
will result in a very hazardous situation.
Figure 4 - Polarity control
Ground cable
Brass nuts
Drive deck cable
Positive stud
Negative stud
NOTE: Electrode negative
polarity (typical for flux core
welding) shown in figure.
Reverse cables for electrode
positive polarity (typical for
MIG welding).
Assembly (Continued)
Models WF2150, WF2154,
WG2160 and WG2164