


9
www.chpower.com
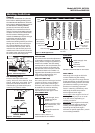
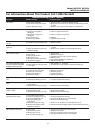
Troubleshooting Chart - Welder
Symptom Possible Cause(s) Corrective Action
For Information About This Product Call 1-800-746-5641
1. Duty cycle exceeded
2. Poor work clamp connection
3. Blown breaker or fuse
1. Wrong size contact tip
2. Torch liner clogged or
damaged
3. Contact tip clogged or
damaged
4. Drive roller worn
5. Not enough tension
1. Slag inside gun nozzle
2. Insulation ring melted/expired
1. Poor contact
2. Using an extension cord with
excessive length
1. Wire jammed
2. Out of wire
3. Not enough tension
4. Wire liner worn
5. Wire disconnected internally
6. Contact tip clogged
1. Wire speed too slow
2. Travel speed too slow or heat
is too high
1. Wire speed setting
2. Contact tip size too large
3. Polarity set incorrectly
4. Drive roller slipping
5. Gas bottle empty
1. Inconsistent travel speed
2. Output heat setting too low
1. Slow and/or inconsistent
travel speed
2. Output heat setting too high
1. Travel speed too fast
2. Wire speed too fast
3. Output heat setting too high
1. Inconsistent travel speed
2. Output heat setting too low
3. No or low shielding gas
4. Wrong shielding gas
(aluminum)
5. Extension cord is too long
6. (Aluminum) Possible oxide
buid-up on surface
1. Damp wire
2. Wire speed too fast
3. Wrong type of wire
4. No or low shielding gas
1. Allow welder to cool until lamp goes out
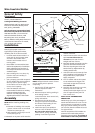
2. Be sure all connections are secure, and attaching surface
is clean
3. Reduce circuit load, reset breaker or replace fuse
1. Use proper size contact tip
2. Clean or replace wire liner
3. Clean or replace contact tip
4. Replace
5. Tighten tension knob
1. Clean slag from gun nozzle
2. Replace nozzle
1. Be sure all connections are secure, and attaching surface
is clean
2. Never use an extension cord longer than 20 ft
1. Reload wire
2. Replace wire spool
3. Tighten tension knob if wire is slipping
4. Replace liner
5. Call 1-800-746-5641 for assistance
6. Replace contact tip
1. Run speed in 7 - 10 range
2. Increase the travel speed or reduce heat settings
1. Tune in correct setting (1-5 mild steel; 5-10 aluminum)
2. Replace contact tip
3. Reverse polarity
4. Increase tension
5. Replace gas bottle
1. Decrease and maintain constant travel speed
2. Increase output heat setting
1. Increase and maintain travel speed
2. Reduce output heat setting
1. Decrease travel speed
2. Decrease wire speed
3. Reduce output heat setting
1. Decrease and maintain constant travel speed
2. Increase output heat setting
3. Use gas for MIG process or refill bottle
4. Use only 100% Argon gas
5. Never use an extension cord longer than 20 ft
6. Clean surface thoroughly with a stainless steel brush only
1. Use dry wire and store in dry location
2. Reduce wire speed
3. Use flux-cored wire when not using gas
4. Use gas for MIG process or refill bottle
No output
Wire tangles at drive roller
Gun nozzle arcs to work
surface
Work clamp and/or cable
gets hot
Wire does not feed
(Aluminum) Wire burns back
into tip or (Aluminum) Metal
bubbles or burns through
Weld pops and sputters
Bead is intermittently too
thin
Bead is intermittently too
thick
Ragged depressions at
edge of weld
Weld bead does not
penetrate base metal
Wire sputters and sticks
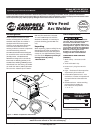
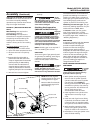
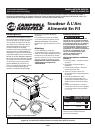
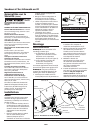
Models WF2150, WF2154,
WG2160 and WG2164