


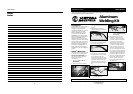


Notes
Notas
7
Model WT2531
2
Installation Instructions
Aluminum Welding Kit
www.chpower.com
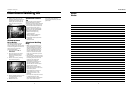
9. Reattach torch cable cover onto
drive deck, making sure wire liner is
aligned with drive roller, but not
touching the roller (see figure 6).
Note: Trim the liner’s length as
needed.
Smooth-Groove
Drive Roller
The existing serrated-groove drive
roller will cut notches in the soft
aluminum welding wire. These notches
increase the drag within the wire liner.
The smooth-groove drive roller
eliminates this problem.
1. Verify the welder is OFF and
UNPLUGGED.
2. Open wire feed door and locate
drive deck. Release tension on
swing arm by rotating tension
screw down.
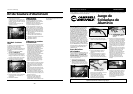
3. Remove roller cover by removing
two screws (see figure 7).
4. Remove serrated-groove drive roller
and replace with new smooth-
groove drive roller.
5. Reinstall roller cover.
Aluminum Contact
Tip
The contact tips in this kit have been
designed specifically for welding
aluminum. The hole is slightly oversized
to reduce drag. There is more mass to
handle the extra heat associated with
aluminum welding. And, the tip is
tapered for use with shielding gases.
These tips are to be used with 0.030"
(0.8 mm) aluminum MIG wire.
1. Remove nozzle by turning
counterclockwise.
2. Remove existing contact tip by
turning counterclockwise.
3. Install 0.030" (0.8 mm) aluminum
contact tip.
4. Reinstall nozzle.
Aluminum Welding
Help
• Make sure your base metal is very
clean. New aluminum will oxidize
almost immediately. Thin layers of
oxidation are clear and cannot be
seen. Use a stainless steel brush to
clean the weld area and the work
clamp area. Use the stainless steel
brush only on aluminum to prevent
contamination.
• The center of the contact tip must be
clean to transfer the current required
for welding aluminum. Even new
contact tips can benefit from
cleaning with a tip cleaner.
• Since aluminum conducts heat so
well, higher welder output is
required. Also, the wire and travel
speeds need to be faster.
• Work clamp connection must be
thoroughly clean and as close to the
weld area as possible.
• When welding thin material, it is
usually easier to use a "push"
technique rather than a "pull"
technique.
• Do not use the components in this kit
to weld anything other than
aluminum to prevent contamination.
If you need to weld mild steel,
Figure 6
Figure 7 – Remove these two screws
remove this kit and install the
original components that came with
your welder.