


B-3
OPERATION
B-3
INVERTER ARC™ 230
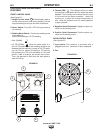
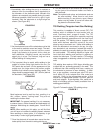
STICK-WELDING CIRCUIT
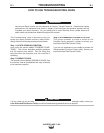
(See Figure B.3)
FIGURE B.3
Current flows through the electrode cable and elec-
trode holder to the electrode and across the arc. On
the work side of the arc, the current flows through the
base metal to the work cable and back to the welding
machine. The circuit must be complete for the current
to flow.
To weld, the work clamp must be tightly connected to
clean base metal. Remove paint, rust, etc. as neces-
sary to get a good connection. Connect the work
clamp as close as possible to the area you wish to
weld. Avoid allowing the welding circuit to pass
through hinges, bearings, electronic components or
similar devices that can be damaged.
An electric arc is made between the work and the end
of a small metal rod, the electrode, which is clamped
in a holder and the holder is held by the person doing
the welding. A gap is made in the welding circuit (see
Figure B.3) by holding the tip of the electrode 1/16-
1/8” away from the work or base metal being welded.
The electric arc is established in this gap and is held
and moved along the joint to be welded, melting the
metal as it is moved.
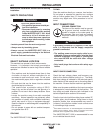
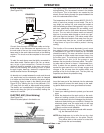
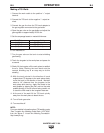
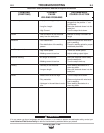
ELECTRIC ARC (Stick-Welding)
(See Figure B.4)
Action that takes place in the electric arc.
FIGURE B.4
This figure closely resembles what is actually seen
during welding. The “arc stream’’ is seen in the middle
of the figure. This is the electric arc created by the
electric current flowing through the space between the
end of the electrode and the work.
The temperature of this arc is about 6000°F (3315°C),
which is more than enough to melt metal. The arc is
very bright, as well as hot, and cannot be looked at
with the naked eye without risking painful injury. A very
dark lens, specifically designed for arc welding, must
be used with a hand or face shield whenever viewing
the arc. The arc melts the base metal and actually
digs into it, much as water through a nozzle on a gar-
den hose digs into the earth. The molten metal forms
a pool or crater and tends to flow away from the arc.
As it moves away from the arc, it cools and solidifies.
A slag forms on top of the weld to protect it during
cooling.
The function of the covered electrode is much more
than simply to carry current to the arc. The electrode
is composed of a core rod of metal with an extruded
chemical covering. The core rod melts in the arc and
tiny droplets of molten metal shoot across the arc into
the molten pool. The electrode provides additional
filler metal for the joint to fill the groove or gap
between the two pieces of the base metal. The cover-
ing also melts or burns in the arc. It has several func-
tions. It makes the arc steadier, provides a shield of
smoke-like gas around the arc to keep oxygen and
nitrogen in the air away from the molten metal, and
provides a flux for the molten pool. The flux picks up
impurities and forms the protective slag.
MAKING A WELD
Insert the bare part of the electrode into the electrode
holder jaws and connect the work clamp to the weld-
ing piece. Make sure to have good electrical contact.
1. Turn the welder on.
2. Lower your welding helmet to protect your face and
eyes.
3. Strike the electrode at the work point on the work-
piece as if striking a match. Do not hit the electrode
on the workpiece, which will damage the stick elec-
trode and make striking an arc difficult. Scratch the
electrode slowly over the metal and you will see
sparks. While scratching, lift the electrode 1/8"
(3.2mm) and the arc will establish.
NOTE: If you stop moving the electrode while scratch-
ing, the electrode will stick.
NOTE: Most beginners try to strike the arc by a fast
jabbing motion down on the plate. Result:
They either stick or their motion is so fast that
they break the arc immediately.