


SKU 67089 For technical questions, please call 1-800-444-3353. Page 6
Anyone using vibrating power tools 1.
regularly or for an extended period
should rst be examined by a doctor
and then have regular medical check-
ups to ensure medical problems are
not being caused or worsened from
use. Pregnant women or people
who have impaired blood circulation
to the hand, past hand injuries, ner-
vous system disorders, diabetes, or
Raynaud’s Disease should not use
this tool. If you feel any medical or
physical symptoms related to vibra-
tion (such as tingling, numbness, and
white or blue ngers), seek medical
advice as soon as possible.
Do not smoke during use. Nico-2.
tine reduces the blood supply to the
hands and ngers, increasing the risk
of vibration-related injury.
Wear suitable gloves to reduce the 3.
vibration effects on the user.
Use power tools with the lowest vi-4.
bration when there is a choice be-
tween different processes.
Include vibration-free periods each 5.
day of work.
Grip the power tool as lightly as pos-6.
sible (while still keeping safe control
of it). Let the tool do the work.
To reduce vibration, maintain the 7.
power tool as explained in this manu-
al. If any abnormal vibration occurs,
stop use immediately.
SAVE THESE
INSTRUCTIONS.
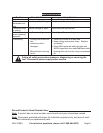
SPECIFICATIONS
Drill Speeds
Variable; 0 - 500 RPM
Forward/Reverse
Chuck Type 3/8” Keyless
Torque Settings
23 Screwdriver
Settings + One Drill
Setting
Trigger Settings Forward/Reverse
Included
Charger (67104)
Battery (67120)
UNPACKING
When unpacking, make sure that the
item is intact and undamaged. If any parts
are missing or broken, please call Harbor
Freight Tools at the number shown on the
cover of this manual as soon as possible.
INSTRUCTIONS FOR
PUTTING INTO USE
Read the ENTIRE IMPORTANT
SAFETY INFORMATION
section at the beginning of this
manual including all text under
subheadings therein before set
up or use of this product.
TO PREVENT
SERIOUS INJURY
FROM ACCIDENTAL
OPERATION:
Turn the Forward/Reverse
Switch of the tool to its center,
locked position and remove
the Battery Pack (38) before
assembling or making any
adjustments to the tool.
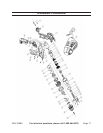
Note: For additional information regarding
the parts listed in the following pages,
refer to the Assembly Diagram near
the end of this manual.