


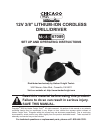

SKU 67089 For technical questions, please call 1-800-444-3353. Page 7
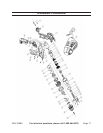
Installing a Drill Bit
Remove the Battery Pack and slide 1.
Direction Switch (43) to its mid-posi-
tion.
While holding Drill/Driver and the 2.
Chuck sleeve (adjacent to the frame)
in one hand, turn the Chuck (26)
counterclockwise to open the jaws.
Insert the bit or a Hex bit/Driver-Drill 3.
bit into the jaws and turn the Chuck
clockwise until secure.
OPERATING INSTRUCTIONS
Read the ENTIRE IMPORTANT
SAFETY INFORMATION
section at the beginning of this
manual including all text under
subheadings therein before set
up or use of this product.
TO PREVENT
SERIOUS INJURY
FROM ACCIDENTAL
OPERATION:
Turn the Direction Switch (43)
of the tool to its center neutral
position and remove the
Battery and any attachments
before performing any
inspection, maintenance, or
cleaning procedures.
Work Piece and Work Area Set Up
Designate a work area that is clean 1.
and well-lit. The work area must not
allow access by children or pets to
prevent injury and distraction.
Secure loose work pieces using a 2.
vise or clamps (not included) to pre-
vent movement while working.
There must not be hazardous ob-3.
jects, such as utility lines or foreign
objects, nearby that will present a
hazard while working.
4. WARNING! Verify that the sur-
face has no hidden utility lines before
drilling or driving screws.
General Operating Instructions
Mark the position of the hole to be 1.
drilled with a center punch to prevent
the Drill from “walking”.
Attach the Battery to the bottom of 2.
the handle, it will click when it locks
into place. Please Note: The Bat-
tery ts only in one position. Do not
force the Pack when inserting.
Press the Direction Switch (43) to 3.
the desired position (Forward or
Reverse). See the forward/reverse
arrows on the sides of the Direction
Switch.
When working with screws, turn the 4.
Torque Selector to any one of the rst
23 torque settings. Do not change
the torque setting while the drill is
moving. And always start from a
lower setting to prevent unnecessary
force.
When drilling a hole, set the Selector 5.
to the “Drill” icon. Pull the Trigger to
start the Drill/Driver. Allow the drill to
come up to full speed, before, apply-
ing it to the work surface.
Hold the Drill rmly with both hands, 6.
as torque will cause the tool to twist.
When drilling through light gauge 7.
metal or thin, soft wood, place a
wooden block behind the material to
prevent burr or splinter damage when