


Page 8SKU 90880
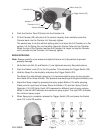
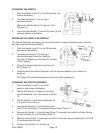
5. Push the Suction Tube (23) back into the Canister Lid.
6. Fill the Canister (25) with paint of the correct viscosity, then carefully screw the
Canister back into the Canister Lid. Securely tighten.
The easiest way to do this without spilling paint is to leave the full Canister on a flat
surface. Lift the Spray Gun and carefully place the Suction Tube into the Canister.
When the top of the Canister reaches the Canister Lid, begin turning the Canister
until it screws into the Canister Lid. Securely tighten.
BEGIN SPRAYING
Note: Always carefully cover areas and objects that are not to be painted to prevent
property damage.
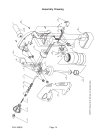
1. Verify that Lock Nut (3) and Nozzle (1) are tightened securely. See photo above.
2. Push the Switch Lock (21) to the On position. This activates the Trigger Switch (20).
3. Hold the Spray Gun horizontally and press the Trigger Switch (20).
The Spray Gun should begin spraying. It is recommended to spray for two minutes,
then leave off for three minutes. This prevents overheating and lengthens Battery use.
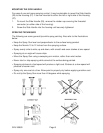
4. Adjust the Spray output by pressing the spray adjust Button (15) while spraying.
Press once for each level of spray. Above the Button (15) are four Spray Control
Regulator (14) LED lights. Each LED represents a different level of spray volume.
When lit, the left LED indicates the maximum spray output. The right LED indicates
the minimum spray output.
5. When Spraying is complete, release the Trigger Switch (20) and press the Switch
Lock (21) to the Off position.
(15)
(14)
Left LED Lit
Right LED Lit
Suction Tube (23)
Canister Lid (11)
(X)
(Y)
Lock Nut (3)
Nozzle (1)
Switch Lock (21)
Trigger Switch (20)