


SKU 93853 For technical questions, please call 1-800-444-3353 PAGE 14
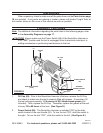
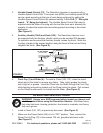
Grasp the Demolition Hammer rmly by its rear Handle (62) and Auxiliary Handle 3.
(104A). Then, turn the Power Switch (66) to its “ON” position to begin work.
IMPORTANT: 4. This Demolition Hammer requires a short period of time to warm
up. Depending on the room temperature, this time may vary from approximately
15 seconds (at 90 degrees Fahrenheit) to 2 minutes (at 32 degrees Fahrenheit).
A new Hammer requires a break-in period before full performance is realized.
This period may require up to 5 hours operation. (See Figure E.)
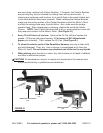
For the best penetration rates in concrete, run the Demolition Hammer with 5.
a steady pressure but do not use excessive force as this will decrease the
efciency of the tool.
If necessary, adjust the Variable Speed Control Dial (72) to increase the tool’s 6.
cutting efciency. (See Figure E.)
When nished using the Demolition Hammer, turn the Power Switch (66) to its 7.
“OFF” position. Then, unplug the tool from its electrical outlet. (See Figure E.)
Allow the Chisel (106, 107) to completely cool. Then, pull and hold the locking 8.
Slider (4) backward and pull the Chisel forward. The Chisel should be cleaned
after removing. (See Figure F.)
Make sure to store the Demolition Hammer in a clean, dry, safe location out of 9.
reach of children and other unauthorized people.
INSPECTION, MAINTENANCE, AND CLEANING
CAUTION! Always make sure the Power Switch (66) of the Demolition Hammer is
in its “OFF” position and the tool is unplugged from its electrical outlet prior to
performing any inspection, maintenance, or cleaning.
Before each use,1. inspect the general condition of the Demolition Hammer.
Check for loose screws, misalignment or binding of moving parts, cracked or
broken parts, damaged electrical wiring, and any other condition that may affect
its safe operation. If abnormal noise or vibration occurs, have the problem
corrected before further use. Do not use damaged equipment.
To replace the Motor Carbon Brushes: 2. It may become necessary at sometime
to replace or clean the two Carbon Brushes (76) when the Motor performance
decreases, or stops working completely. The Carbon Brushes are located on
each side of the Motor Casing (61). To replace the Carbon Brushes, remove
the two Brush Holder Covers (79). Remove the Brush Caps (77). Then, remove
the two Carbon Brushes from the two Brush Holders (75). If the Carbon Brushes
REV10d