


Page 11SKU 97743 For technical questions, please call 1-800-444-3353.
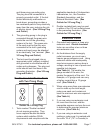
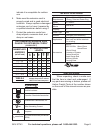
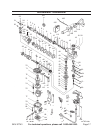
side and a symbol for a Drill only on
the right side. (See Figure A.)
To drill only: Set the Switching
Knob (24) so that the symbol of
the Hammer and Drill are facing
forward. Then turn the Selector
(91) so that it points to the right at
the Drill symbol. (See Figure A.)
To hammer drill: Set the Switching
Knob (24) so that the symbol of
the Hammer and Drill are facing
forward. Then turn the Selector
(91) so that it points to the left at the
Hammer and Drill symbol.
(See Figure A.)
To chisel: Set the Switching Knob
(24) so that the symbol of the
Hammer only points forward. Then
turn the Selector (91) so that it
points left to the Hammer and Drill
symbol. (See Figure A.)
NOTE: Break Point (Bull) bits and
cold chisels should be used when
the Switches are in the hammering
chisels with the Switches in the
unexpected tool performance.
Workpiece and Work Area Set Up
Designate a work area that is clean 1.
and well-lit. The work area must not
allow access by children or pets to
Route the Power Cord (112) along 2.
a safe route to reach the work area
without creating a tripping hazard or
exposing the Power Cord to possible
damage. The Power Cord must
reach the work area with enough
extra length to allow free movement
while working.
Secure loose workpieces using a vise 3.
or clamps (not included) to prevent
movement while working.
There must not be hazardous 4.
hazard while working.
OPERATING INSTRUCTIONS
Read the ENTIRE IMPORTANT
SAFETY INFORMATION section
at the beginning of this manual
including all text under
subheadings therein before set
up or use of this product.
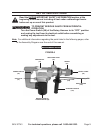
Inserting and Removing Drill Bits:
CAUTION: 1. Always wear heavy duty
work gloves to provide protection
when inserting and removing drill bits.
Drill bits become very hot in use. Do
not remove drill bits until the bit has
completely cooled. Do not strike
stuck bits with a hammer as metal
the Power Cord (112) from its
electrical outlet when inserting and
removing bits and chisels.
Add a light coating of grease or 2.
machine oil to the drill bit shank.
Pull back on the Spring (41) while at 3.
the same time inserting and turning
the Drill Bit until it slides all the way in
the Front Cover (39). Then release
the Spring so that it returns to its
original position. NOTE: You should
not be able to move the Bit without
pulling back on the Spring again.
Make sure the Bit does not move to
ensure that it is properly locked in
place. (See Figure A.)