Page 12SKU 97743 For technical questions, please call 1-800-444-3353.
To remove the Drill Bit, pull back on 4.
the Spring (41) and pull out the Bit.
For optimal performance, always
keep Drill Bits and Chisels sharp.
NOTE: When drilling a hole larger
Drill Bit with four cutting edges.
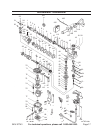
(See Figure A.)
General Operating Instructions
Before plugging in the Power Cord 1.
the Auxiliary Handle (107) and Depth
Gauge (106) to the desired positions.
(24) and Selector (91) to the desired
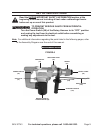
positions. (See Figure A.)
Make sure the Power Switch (96) is 2.
in its “OFF” position. Then plug the
Power Cord (112) into the nearest
110 volt, grounded, electrical outlet.
(See Figure A.)
When ready to use the Rotary 3.
Hammer, squeeze the Power Switch
(96) and allow the tool to run without
load for about one minute. This
allows the tool’s parts to become
properly lubricated. Check to see
if the running tool sounds normal.
Once the tool has been warmed up, it
is ready for use. (See Figure A.)
4.
Hammer, release the Power Switch
(96). Wait until the tool comes to a
complete stop. Then unplug the tool
from its electrical outlet. (See Figure
A.)
Make sure the Drill Bit is completely 5.
cooled. Then remove the Bit from
the tool.
Store the Rotary Hammer in its 6.
Carrying Case (105) and keep the
Case in a clean, dry, safe location out
of children’s reach.


