


Page 5SKU 95573
For technical questions, please call 1-800-444-3353.
INSTALLATION INSTRUCTIONS
Note: Your Solar Shed Light will require installation. It is important that you read the entire
manual to become familiar with the product BEFORE you use the Solar Shed Light.
Before operating this product be sure that you have all parts described in the Parts
List and Assembly Diagram located on page 10 of this manual.
If you do not have experience or have not done wiring of this type before, contact
a qualified electrician to install the Solar Shed Light.
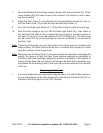
Decide where you want to place the Solar Shed Light and Solar Panel. The Solar
Panel assembly must be set in a location that receives full, direct sunlight a minimum
of six hours a day. The location should not be near nighttime light sources such as
porch lights or street lights as this may cause the lights to flicker. The Solar Shed
Light and Solar Panel assembly must be installed within 8 ft. of each other to allow
for the Cord (10) connection. See Figure 1.
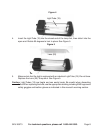
The Solar Shed Light can be mounted with Screws (23) and Anchors (24). Make a
mounting template by tracing the mounting holes on the back of the light. Do not
insert the Screws (23) all the way. The head of the Screw (23) must stick out a small
amount from the wall to allow clearance to hang the Shed Light from the Screw
Mounting Holes. See Figure 2.
Place the Solar Panel assembly in the desired spot in the out-of-doors where it can
charge with sunlight.
Using the Bracket (8) as a template, mark the location on the wall where the Screws
(23) and Anchors (24) will be used for mounting the Bracket (8).
Figure 1
Solar Panel (1)
Bracket Knobs (9)
Bracket (8)
Back view of Light
Mounting hole
Figure 2
Mounting hole
Use an awl or drill to set the Screw path. Beware of any electrical lines in the drill-
ing pathway. Make sure there are no wires, pipes or cables behind where you plan
to drill.
1.
2.
3.
4.
5.
6.