


Page 6SKU 95573
For technical questions, please call 1-800-444-3353.
Mount the Bracket (8) to the shed using the Screws (23) and/or Anchors (24). When
using Anchors (24) drill holes the size of the Anchors. Tap Anchors in with a ham-
mer (not included).
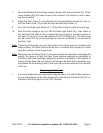
Attach the Solar Panel (1) to the Bracket (8) using the Bracket Knobs (9), then at-
tach the Power Cord (10) to both the Light and the Solar Panel (1).
Turn OFF the Shed Light Switch (21). Tilt the Solar Panel to catch the sun’s rays.
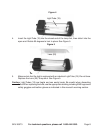
After the initial charge is set, turn ON the Shed Light Switch (21), then check to
see that the Shed Light is ON by viewing the light at night or in a dark location. If
the Light (19) is not lit, check the position of the “ON” Switch (21). The Shed Light
can be turned “ON” by manually pulling the cord on the Switch 21) on the side of
the Solar Light.
Note: If attaching to the shed roof, you may need to use roofing cement to maintain roof
water proofing. The Solar Panel must be set in a location that receives full, direct
sunlight a minimum of six hours a day.
Note: During the day, the Solar Panel (1) converts sunlight into electricity, recharging the
battery. The amount of light the Solar Panel receives depends on placement of
the Solar Light Panel assembly, geographic location and weather. If the weather is
cloudy and the Panel did not receive a full charge, the Solar Panel assembly may
not achieve the full operating time. It will catch up on its own after two to three days
of full sun.
Replacing the Batteries
It is recommended that you replace the batteries every 12 months. Before perform-
ing any maintenance on the Solar Shed Light, make certain that the Switch (21) on
the side of the Solar Light is in the “OFF” position.
7.
8.
9.
10.
1.