


2-15
Cisco 1711 and Cisco 1712 Security Access Routers Hardware Installation Guide
OL-4050-02
Chapter 2 Installation
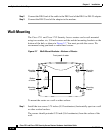
Optional Installation Steps
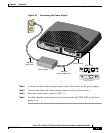
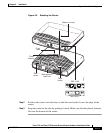
Step 2 Hang the router on the screws with either the left side or right side mounting
brackets so that
• The LEDs are visible to the user—Because the LEDs indicate the router
operating status, they need to be easily visible.
• The power supply does not hang from its cable—If the power supply is not
supported, it might disconnect from the cable that connects it to the router.
Caution If you install the screws in drywall, use hollow-wall anchors (1/8 inch
by 5/16 inch) to secure the screws. If the screws are not properly anchored, the
strain of the cables connected to the router rear-panel connectors could pull the
router from the wall.
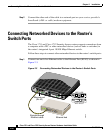
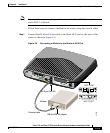
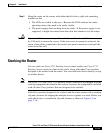
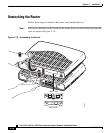
Stacking the Router
You can stack one Cisco 1711 Security Access router and/or one Cisco 1712
Security Access router in a four-device stack, along with other Cisco products
designed to be stacked with the router. You can stack each device directly on top
of another device.
Note The Cisco 1711 and Cisco 1712 Security Access routers are not shipped with the
stacking equipment described in this section; however, the equipment is included
with all other Cisco products that are designed to be stacked.
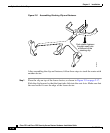
Each Cisco product designed to be stacked with the router comes with a stacking
clip and a fastener for keeping the multiple devices together in a stack. Before you
stack the devices, assemble the clip and fastener as shown in Figure 2-8 on
page 2-16.