


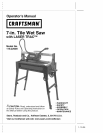

I
I
I
I
MOVING THE SAW cont.
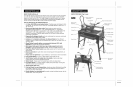
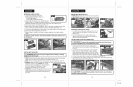
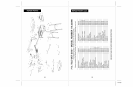
4. Your tile wet saw has been equipped with a set of wheels for easy transporting.
They are to be used when the legs of the saw table are in the closed, or folded up
position. To use wheels, simply pull out and down on the black handle located on
the wheels' axle (Fig. 32). When not using the wheels, and to set up the saw in a
new location, retract the wheels by pulling out the knob located on the table base
directly above the wheels (Fig. 32a).
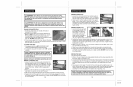
5. Once your saw is folded up,
you can easily move your
saw with the double handle.
To use the double handle,
loosen the knob holding it
in place (Fig. 33), and
extend it to its full length
by pulling it from the saw
table base.
z_WARNING:To avoid accidents, ALWAYS disconnect the tool from the
power source BEFORE making adjustments, cleaning or performing any
maintenance.
NOTE: All parts represent an important part of the double insulation and
should be serviced ONLY at a Sears Service Center.
NOTE: DO NOT at any time allow solvents, such as brake fluid, gasoline,
petroleum=based products, penetrating oils, etc. to come in contact with
plastic parts. They contain chemicals that can damage, weaken or destroy
plastic.
. BEFORE each use check blade for cracks or damage.
2. The tile saw MUST BE cleaned and dried after each use and stored in a dry
location. Use clean cloths to remove dirt, carbon dust, etc.
3. WIPE OFF all exterior surfaces and keep the cutting table clean and free of
all debris.
4. KEEP the ventilation slots of the tile saw clean to prevent overheating of the motor.
20
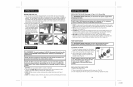
REPLACING THE BLADE (See page 14, Figs. 18, 19, 20 and 20a)
z_WARNING: MAKE SURE that you disconnect the power supply before 1
replacing the blade.
J
NOTE: ONLY USE diamond saw blades with a diameter of 7=in. minimum
and 8=in. maximum. The bore of the blade must be 5/8=in. ]
1. FIRST, to disconnect the water supply; press the blue ring and pull out the water
supply tube from the inlet connection on the blade guard (see Fig. 18 on page 15).
2. NEXT, remove the blade guard by removing the two securing screws
(see Fig. 19 on page 16).
3. LOOSEN the nut by using the hexagonal wrench to turn the blade-securing nut
clockwise while using the motor shaft securing wrench to hold shaft stationary
(see Fig. 20 on page 16). Remove nut and front flange, then blade.
4. BE SURE that the shaft and flanges are clean; then, paying attention to the
directional arrows on the blade, mount new blade and replace outer flange and
blade-securing nut. Adjust blade and tighten (see Fig. 20a on page 16).
PUMP MAINTENANCE
WARNING: MAKE SURE that you have disconnected the power
supply before performing maintenance on or replacing the pump.
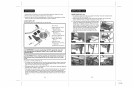
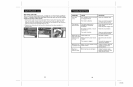
CLEANING THE PUMP
1. To clean the pump, remove from housing in
water tray. Take off the intake cover (Fig. 34).
2. Take out the pump filter and impeller cover.
3. Use a small brush or stream of water to
remove any debris on the pump filter and
impeller cover (Fig. 34).
NOTE: Always clean the pump after each
use. Dried debris may stick to the filter
foam and the impeller, requiring
replacement of the pump filter and/or
pump.
Intake
cover
\
Foam
filter
Impeller
cover
]
Motor
head
REPLACING THE PUMP FILTER
1. Remove the intake cover.
2. Take out pump filter and replace with the new one, (Fig. 34).
3. If after replacing the filter the pump is still not working, replace the pump.
21
I
I
I
I
2-2-06