


I
I
I
I
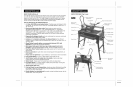
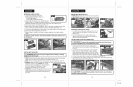
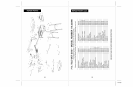
KNOW YOUR SAW (Fig. 3)
Your tile wet saw has a precision-built electric motor and it should only be connected
to a 120-volt, 60Hz AC ONLY power supply (normal household currant). DO NOT
operate on direct current (DC). The large voltage drop would cause a loss of power
and the motor would overheat. If the saw does not operate when plugged into the
correct 120-volt, 60-Hz AC ONLY outlet, check the power supply.
This Tile Wet Saw has the following features:
1.6.7 Amp, 3550 RPM (no-load speed) motor. Provides power and torque for fast,
smooth 90 rip cuts and 0 to 45 miter cuts. The bridge adjusts to allow for 0 to
45 bevel cuts.
2. Easy-to-read bevel and miter scales. Bevel scales on each end of the
adjustable pivoting bridge for 0 to 45 angle adjustments in 5 increments.
Rip/Miter Guide allows 90 rip cuts and 0 to 45 miter cuts. Durable plastic has
embossed 0 to 45 angle adjustments in single degree increments. Clear
window in metal part of rip/miter guide shows ruler on fence to allow accurate
measuring of workpiece.
3. Ergonomically designed handle with sort comfort grip for maximum control and
comfortable hand support when cutting.
4. Includes a 7-in. diameter continuous rim diamond blade for fast, efficient
cutting of ceramic, marble, slate or limestone wall or floor tile. Cuts tiles up to 1-in.
(25.4mm) thick.
5. Blade/Cutting Assembly glides on permanently lubricated 100% ball
bearings for long tool life and smooth operation.
6. Metal upper blade guard, table base, legs, bridge supports and motor
housing for long-lasting dependable strength. Aluminum bridge and fence.
7. Dual Spray Water Feeder System keeps blade evenly wet for maximum blade
performance.
8. Easy-to-use knobs for quick miter, bevel and compound miter adjustments, no
tools needed.
9. Project ruler on right fence for quick reference; 1 to 9-inches in 1/8-in increments
10. Laser On/Off Switch - To turn on laser system, push switch to "On"
11. On/Off Starter Switch with safety tab in the middle - Remove tab when
finished with saw to prevent accidental starting.
12. Splash Guard - Keeps water from splashing so work area stays clean.
13. Leg Adjust Knobs - To change height of table quickly and easily. One leg has
set screw to level saw in work place.
14. Sturdy Plastic Water Tray
15. Fold-up Wheels for easy transporting - wheels pop down effortlessly by pulling
the handle on their axle. You can easily move the folded-up saw from place to
place as your tiling needs dictate.
16. Double Handles on retractable pull for easily moving the folded-up saw, with its
wheels down, to the next job site.
12
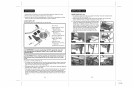
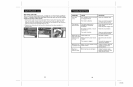
KNOW YOUR SAW ( Fig. 3) cont.
|
Blade/Cutting
Assembly
Splash Guard
Cutting Slot
Blade
Water Pump
Leg adjust
knobs
Water and Electric
Supply Hose
Laser System
"On/Off" Switch
Blade Assembly Handle
Bridge adjusts with
/
bevel
gauge
Water Tray
Wheel Assembly
Bevel adjust knob
Rip/Miter Guide
Bevel Gauge
Fence
igle Padded
Table Handle
Retracting Knob
Leg adjust knobs
Set screw to
level saw
Bevel adjust knob
Bevel Gauge
Hook Double Handle for
moving folded saw
Wheel Assembly
I
I
I
I
2-2-06