


6
3.
THE DIAMETER OF THE GRINDING WHEELS
W
ILL DECREASE WITH USE
.
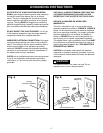
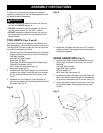
Adjust the tool rests
and spark arrestors to maintain a distance of 1/16”
from the wheel.
4. DO NOT STAND IN FRONT OF THE BENCH
G
RINDER WHEN STARTING IT
.
Stand to one side
of the Bench Grinder and turn it “ON”. Wait at the
side for one minute until the grinder comes up to
full speed. There is always a possibility that debris
from a damaged grinding wheel may be discharged
towards the operator.
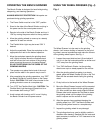
5. THE BENCH GRINDER WILL PRODUCE SPARKS
AND DEBRIS DURING GRINDING OPERATIONS
.
Be sure that there are not any flammable materials
in the vicinity. Frequently clean grinding dust from
the back of the Bench Grinder.
6.
NEVER FORCE THE WORKPIECE AGAINST A
GRINDING WHEEL, especially if the wheel is cold.
Apply the workpiece slowly, allowing the grinding
wheel an opportunity to warm up. This will minimize
the chance of wheel breakage. DO NOT grind using
the sides of the grinding wheels. DO NOT apply
coolant directly to the grinding wheel.
7. KEEP ALL WHEEL GUARDS IN PLACE. DO NOT
USE THE BENCH GRINDER WITH THE WHEEL
GUARDS REMOVED.
8. KEEP THE TOOL RESTS FIRMLY TIGHTENED.
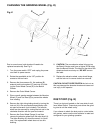
9. ALWAYS USE THE SUPPLIED WHEEL DRESSER
TO RESURFACE THE FACE OF THE GRINDING
WHEEL.
SPECIFIC SAFETY INSTRUCTIONS
FOR BENCH GRINDERS
The operation of any grinder can result in debris being
thrown into your eyes, which can result in severe eye
damage. ALWAYS wear Safety Goggles (that comply
with ANSI standard Z87.1) when operating the grinder.
S
afety Goggles are available at Sears Retail Stores.
Keep your thumbs and fingers away from the grinding
w
heels.
1. ALWAYS USE THE EYE SHIELDS AND WHEEL
GUARDS provided with the grinder.
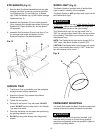
2.
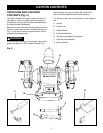
REPLACE A CRACKED OR DAMAGED GRIND-
ING WHEEL IMMEDIATELY. A damaged wheel can
discharge debris at a high velocity towards the
operator. Carefully handle the grinding wheels since
they are abrasive. Prior to replacing a grinding
wheel, check it for cracks.
DO NOT remove the
blotter or label on both sides of the grinding wheel.
Tighten the spindle nut just enough to hold the
grinding wheel firmly to the Bench Grinder. Do not
over-tighten the nut. Excessive clamping force can
damage the grinding wheel. Only use the wheel
flanges provided with the grinder. When selecting a
replacement grinding wheel, verify that the grinding
wheel has a higher R.P.M. rating than the maximum
R.P.M. of the Bench Grinder.
ACCESSORIES AND ATTACHMENTS
AVAILABLE ACCESSORIES
Visit your Sears Hardware Department or see the
Sears Power and Hand Tool Catalog for the following
accessories.
ITEM STOCK NUMBER
Replacement grinding wheels See catalog or store
Wire and Buffing wheels See catalog or store
Spacers See catalog or store
Wheel dressers See catalog or store
Stand See catalog or store
Sears may recommend other accessories not listed in
this manual.
See your nearest Sears Hardware Department or Sears
Power and Hand
Tool Catalog for other accessories.
Do not use any accessory unless you have completely
read the Owner’s Manual for that accessory.
Use only accessories recommended for this Bench
Grinder. Using other accessories may cause serious
injury and cause damage to the Bench Grinder
.
WARNING
!