


20
21
MAINTENANCE cont.
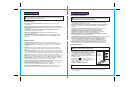
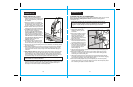
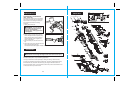
CHUCK REMOVAL
(Fig. 16, 16a and 16b)
The chuck may be removed and replaced
with a new one.
1. Unplug the hammer drill.
MAINTENANCE
It has been found that electric tools are subject to accelerated wear and possible
premature failure when they are used to work on fiber glass boats and sports cars,
wallboard, spackling compounds or plaster. The chips and grindings from these materials
are highly abrasive to electrical tool parts, such as bearings, brushes, commutators, etc.
Consequently, it is not recommended that this tool be used for extended work on any
fiberglass material, wallboard, spackling compound or plaster. During any use on these
materials, it is extremely important that the tool is cleaned frequently by blowing with
an air jet.
Periodic maintenance allows for long life and trouble-free operation. A cleaning, lubrication
and maintenance schedule should be maintained. As a common preventive maintenance
practice, follow these recommended steps:
1. When work has been completed, clean the tool to allow smooth functioning of the tool
over time.
2. Use clean damp cloths to wipe the tool.
3. Check the state of all power cords.
4. Keep the motor air vent openings free from oil, grease and sawdust or woodchips,
and store tool in a dry place.
5. Be certain that the chuck and jaws are well lubricated with a light machine oil, particularly
after lengthy exposure to damp and/or dirty conditions.
6. Apply a light coat of machine oil to the surface of the chuck face and jaws from time
to time for rust resistance.
!
WARNING:
To ensure safety and reliability, repairs, maintenance and
adjustments MUST be performed by a qualified service technician at a
Sears Service Center.
!
WARNING:
For your safety, ALWAYS turn off switch and unplug drill from
the power source before performing any maintenance or cleaning.
!
WARNING:
Always wear safety goggles or safety glasses with side shields
during power tool operations, or when blowing dust. If operation is dusty, also
wear a dust mask.
!
WARNING:
DO NOT at any time let brake fluids, gasoline, petroleum-based
products, penetrating oils, etc. come in contact with plastic parts. Chemicals can
damage, weaken or destroy plastic, which may result in serious personal injury.
!
WARNING:
For your safety, ALWAYS turn off switch and unplug saw from
the power source before performing any maintenance or cleaning.
ROUTINE MAINTENANCE
!
WARNING:
To prevent personal
injury, ALWAYS disconnect the plug
from power source BEFORE
assembling parts, making adjustments
or changing bits.
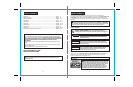
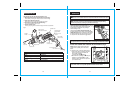
Fig. 10
4
5
6
7
0
1
7
2. Insert a 5 /16-in. or larger hex key into the
chuck of the drill and tighten the chuck
jaws securely with the chuck key and
spindle lock.
3. Tap the hex key sharply with a mallet in a
clockwise direction. This will loosen the
screw in the chuck for easy removal.
4. Open the chuck jaws and remove the
hex key. Using a screwdriver, remove the
chuck screw by turning it in a clockwise
direction (see Fig. 16a). Note that the
chuck screw has left hand threads and
clockwise direction loosens instead of
tightens.
5. Insert the hex key into the chuck and
tighten the chuck jaws securely. Tap
sharply with a mallet in a counterclockwise
direction (see Fig.16b). This will loosen
the chuck on the spindle. It can now be
unscrewed by hand.
Fig. 16
Fig. 16a
Fig. 16b