


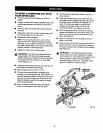

TO MAKE A COMPOUND CUT WITH •
YOUR MITER SAW:
• Pulloutthe lockpinand lift saw armto itsfull •
height.
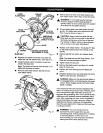
• Loosenthe miter lock handle. Rotate the miter lock
handle approximatelyone-half turnto the le_tto
loosen.
• Press the miter lock plate down with your thumb
and hold. •
• Rotate the controlarm until the pointer aligns with
the desired angle on the miter scale.
• Release the miter lockplate. •
Note: You can quicklylocate 0", 22-1/2" leftor
right,and 45" left or rightby releasingthe miter •
lock plate as you rotate the control arm. The miter
lock plate willseat itselfin one ofthe positive stop
notches, locatedin mitertable frame.
• Tightenthe miter lock handle securely.
_I, WARNING: To avoidserious personalinjury,
alwaystightenthe miterlock handle securely
before making acut. Failureto do socould result
in movement ofthe controlarmor miter table
while making a cut.
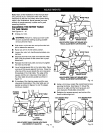
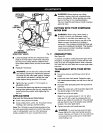
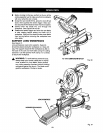
• Loosenthe bevel lockknob and move the saw arm
tOthe _e_tto the desired bevel angle.
• Bevel angles can be set from 0" to 45".
• For your conveniencethere is a double scale
locatedon themountingbracket. See Figure27. If
one side becomes difficultto read as you movethe
saw arm tothe left, simplyreferto the otherside.
Alignthe indicatorpointfor the side you choose
with the desired angle.
• Once thesaw arm has been setat the desired
angle, securelytighten the bevel lockknob.
Recheck miter angle setting. Make a test cut in
scrap material.
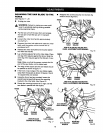
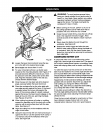
Place the workpieceflat on the mitertable with
one edge securelyagainstthefence. If the board
iswarped, place the convexside againstthe
fence. If the concave edge of a boardcould
collapseon the blade at the end ofthe cut,
jamming the blade. See Figures33 and 34.
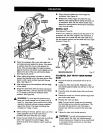
When cuttinglongpieces of lumberor molding,
supportthe oppositeend ofthe stockwitha miler
stand or witha work surface _evelwith the saw
table. See Figure 31,
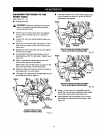
Align the cutting line on the workpiece with the
edge of saw blade.
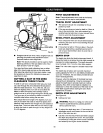
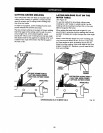
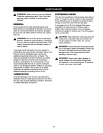
Grasp the stock firmly with one hand and secure it
againstthe fence. Use the optional work clamp or
a C-clamp to secure the workpiece when possible.
See Figure 29.
_IL WARNING: To avoidserious personal injury,
always keep your hands outside the no hands
zone; at least 3 in. from blade.Never performany
cutting operationfreehand (without holding
workpiece against the fence). The blade could
grab the workpiece if it slips or twists.
COMPOUND
MITERCUT
C-CLAMP
Fig. 29
22