


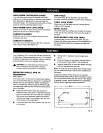
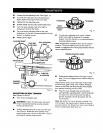

HOLD DOWN FOOT/BLADE GUARD
The hold down foot should be lowered until itjust
rests on top Ofthe workpieoe to prevent the workpieco
from liftingwhile cutting, but not so much that the
workpiece drags. The vertical portion provides e blade
guard to prevent accidental blade contact.
HOLD DOWN FOOT LOCK KNOB
Allows you to raise or lower the hold down foot/blade
guard and secure it at desired heights.
SAWDUST BLOWER
Keeps the line of cut on workpiece clean for more
accurate scroll cuts.
SAWDUST EXHAUST
Your saw has a sawdust exhaust that fits a standard
shop vacuum hose. See Figure 13.
SAW TABLE
Your scroll saw has an aluminum saw table that
provides a working surface to support your workpiece.
TABLE LOCK KNOB
Allows you to tilt the table end lock it at the desired
angle up to 45 degrees.
BEVEL SCALE
The bevel scale and indicator are located on the front
of the saw for easy viewing. They show the angle of
the table.
ZERO DEGREE STOP FOR TABLE
Located under the front of the saw table, the zero
degree stop allows easy return and fine adjustment of
the zero degree relationship between the table and
the blade.
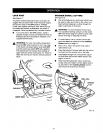
Your Craftsman 16 in. scroll saw was fully assembled
at the factory. Before operating this tool, it is important
to check all alignments and settings. Normal handling
during shipment may have changed settings.
_1_ WARNING: To avoid serious personal injury
from unexpected tool movement, always
securely mount scroll saw to a workbench.
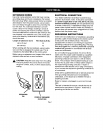
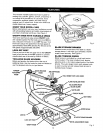
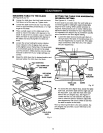
MOUNTING SCROLL SAW TO
WORKBENCH
See Figure 6.
If the scroll saw is to be used in a permanent applica-
tion, we recommend that you secure it in e permanent
location such as a workbench. When mounting the
saw to a workbench, holes should be drilled through
the supporting surface of the workbench using dimen-
sions i_lustrated.
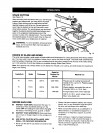
• Each hole in the base of the saw should be
bolted securely using 5/16 in. diameter machine
bolts, lock washers, and hex nuts (not included).
Bolt should be of sufficient length to accommo-
date the saw base, lock washers, hex nuts, and
the thickness of the workbench.
• Locate end mark the holes where scroll saw is to
be mounted.
• Drill (3) 3/8 in. diameter holes through work-
bench.
• Place scroll saw on workbench aligning holes in
the base with holes drilled in the workbench.
• Insert all three 5/16 in. bolts and tighten securely
with lock washers and hex nuts.
Note: All bolts should be inserted from the top. Install
the lock washers and hex nuts from the underside of
the bench.
Supporting surface where scroll saw is mounted
should be examined carefully after mounting to insure
that no movement during use can result. If any tipping
or walking is noted, secure workbench or supporting
surface before beginning cutting operations.
9
24 in.
3/8 in. dia,
q4_1_ in. 19in.
6 5/8 in
12in.
Fig. 6
11