


5
3. Charge for at least 1 hour.
4. The LED will glow red when the
battery is charging and green when
it is ready to use. If the LED does not
illuminate when the handle is placed in
the charge rack, check to make sure
that there is proper contact between
the handle and the charger base.
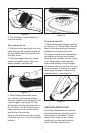
5. A second charging bay is provided
on the charge rack to charge a second
battery (not included). To charge a
battery in this bay, insert the battery
until it locks in place and the LED
illuminates. (see gure 2) The LED
will glow red when the battery is
charging and green when it is ready
to use. When charging two batteries
(one in the handle and one directly in
the charger), the charger will charge
whichever battery was inserted
rst. Then when that battery is fully
charged, it will automatically switch
and charge the other battery. Each
battery will take approximately 1 hour
to charge (a total of 2 hours for two
batteries).
Figure 2
Charging Notes:
CAUTION: The charger can only
be used with 60 cycle, 115-120 VAC
electricity.
The charger unit plugged into the AC
outlet will normally become warm to
the touch during charging.
The charger automatically controls
the charge to each battery and shuts
of the charge when complete. The
batteries can be left in the charger
indenitely and will not over-charge.
Longest life and best performance will
be obtained when charging at normal
room temperature.
Battery life is dependent on usage,
storage temperature and time.
CONNECTING TOOL ATTACHMENT
TO THE POWER HANDLE
Be sure to follow the following
safety precautions when attaching
and detaching tools from the power
handle.
Remove the battery from the handle
before attaching or detaching tools.
Never touch the control switches on
the power handle when attaching and
detaching tools
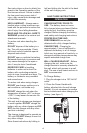
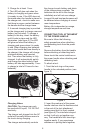
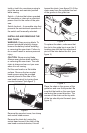
To attach a tool:
1. Twist the lock ring on the power
handle to the unlocked position. (see
gure 3)
Figure 3
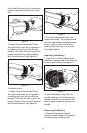
2. Insert the male end of the power
handle interface into the female socket
in the end of the tool attachment
making sure that it is rmly seated.
(see gure 4) The interface is keyed
so that it will only go together one
way. The handle and tool should go
together easily. If you experience
resistance in putting them together,