


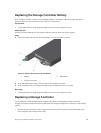
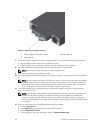


Figure 26. Replacing a Storage Controller
1. Storage controller 2. Release lever
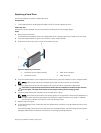
7. Locate the battery removed in a previous step and insert it into the replacement storage controller.
a. Align the battery with the slot on the storage controller.
b. Slide the battery into the storage controller until the release tab clicks into place.
8. Insert the replacement storage controller into the chassis until it is fully seated.
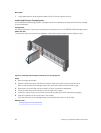
9. Reconnect all the cables to the left storage controller.
10. Push the release lever toward the chassis until it clicks into place. The storage controller is powered
on.
NOTE: When a storage controller is powered on, there is a one‐minute delay while the storage
controller prepares to boot. During this time, the only indication that the storage controller is
powered on are the LEDs on the storage controller. After the one‐minute delay, the fans and
LEDs turn on as an indication that the storage controller is starting up.
11. In the Dell Storage Client, make sure that the replacement storage controller is recognized and
shown as up and running.
NOTE: If the Storage Center software on the replacement storage controller is older than the
software on the existing storage controller, the storage system updates the replacement
storage controller with the software version on the existing storage controller. The Storage
Center software update on the replacement storage controller may take from 15 to 45 minutes
to complete.
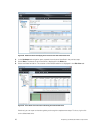
12. Clear the swap status for the temperature sensor and I/O module.
a. Click the Hardware tab.
b. In the Hardware tab navigation pane, expand the enclosure.
c. Select Temperature Sensors.
d. In the right pane, right-click the sensor, then click Request Swap Clear.
e. Select I/O Modules.
f. In the right pane, right-click the module, then click Request Swap Clear.
g. Click the Alerts tab.
34
Replacing SCv2000/SCv2020 Components