


11
INSTALLATION AND BREAK-IN PROCEDURES
2. Place your left hand on the air compressor handle,
and your right hand on the starter handle, and pull
cord out quickly to overcome engine compression
and prevent "kickback". If engine does not start,
push the choke about three-quarters of the way in
or choke lever three quarters to the left and pull
starter handle again. When engine starts, push
choke in or choke lever to the left gradually.
3. Pump Break-in: Open the outlet valve to prevent
tank pressure build-up. Run the air compressor for
30 minutes to seat the rings and lubricate all internal
surfaces. This operation must be completed only
once when first putting the unit in service.
4. After completing the above, and when ready to
begin using the compressor, move the unloader
valve toggle lever to a horizontal position. Close the
outlet valve to build tank pressure.
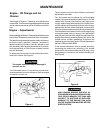
5. Engine Break-in: After the 1st 5 hours of normal
running, change the engine oil. Then after every 25
hours the engine oil should be changed.
10. After the water has been drained, close the drain
cock. The compressor outfit can now be stored.
Perform the following checks before starting the com-
pressor outfit.
1. Make sure that nothing is blocking the belt guard air
openings or air filter opening.
2. Pull the ring on all safety valves to make sure the
valves move freely and smoothly.
3. Check the oil level in the pump as well as the
engine. Add oil if necessary.
4. Clean or blow off fins or any part of compressor that
collects dust and dirt. Compressor will run cooler
and provide longer service.
Start the compressor outfit and check the following:
1. Before attaching an air hose or accessory, make
sure the engine is off. Close the outlet valve or
pressure regulator. (If an optional air pressure
regulator is not used, do not use accessories
rated at less than 110 psig.)
2. Attach hose and accessory.
Daily Start-Up Checklist
3. Check the manufacturer's maximum pressure rat-
ing for air tools and accessories. The compressor
outlet pressure must never exceed the maxi-
mum pressure rating.
4. Start the engine and allow tank pressure to build.
Your outfit is ready for use.
DRAIN TANK DAILY. WATER WILL CON-
DENSE IN TANK. IF NOT DRAINED, WATER
WILL CORRODE AND WEAKEN THE AIR
TANK CAUSING A RISK OF TANK RUP-
TURE. SEE STEP 9.
Serious damage may result if the following
break-in instructions are not followed.
OPERATING PROCEDURES
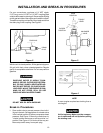
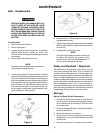
9. With tank pressure at approximately 20 PSI, open
the drain cock and allow moisture to drain. Turn the
drain T-handle counterclockwise to open.
Compressed air from the outfit may contain
water condensation and oil mist. Do not
spray unfiltered air at an item that could be
damaged by moisture. Some air operated
tools or devices may require filtered air.
Read the instructions for the air tool or
device.
TOO MUCH AIR PRESSURE CAUSES A
HAZARDOUS RISK OF BURSTING. CARE-
FULLY FOLLOW STEPS 3 THROUGH 10
EACH TIME THE COMPRESSOR IS USED.
NOTE
If drain cock is clogged, release all air pressure.
The drain cock can then be removed, cleaned,
and then reinstalled.
When you are finished:
5. Turn off engine.
6. Shut off outlet valve or air pressure regulator.
7. Remove air tool or accessory.
8. Open outlet valve or regulator and allow air to
slowly bleed from the tank. Close the outlet valve
or regulator when the tank pressure is approxi-
mately 20 psig.