


11
SERVICE INSTRUCTIONS
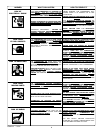
Air Filter - Inspection and Replacement
Keep the air filter clean at all times. Do not operate
the compressor with the air filter removed.
A dirty air filter will not allow the compressor to operate at full
capacity. Before you use the compressor, check the air filter to be
sure it is clean and in place.
If it is dirty, replace it with a new filter. On some models, the filter
may be removed by using a pair of needle nosed pliers or a
screwdriver. Pull or pry out the old filter. Push in the new air filter.
Other models require removal of the filter retainer.
Oil - Checking and Changing
Overfilling with oil will cause premature compressor
failure. Do not overfill.
Check oil level in the crankcase daily. Remove the oil fill plug. The
oil level should be even with the top of the fill hole and must not be
allowed to be lower than 3/8" from the top (6 threads) at any time. It
is recommended that the oil be changed after every 100 hours of
operation. To drain the oil, remove the oil drain plug and collect the
oil in a suitable container. Be sure to replace the plug securely before
adding new oil. Use a compressor oil such as Castrol Heavy Duty
30 weight. Crankcase oil capacity is 16 fluid ounces (473.2 ml).
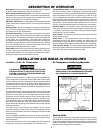
Check Valve - Inspection and Replacement
Remove and inspect the check valve at least once a year or more
often if the compressor is heavily used. Moisture and other
contaminants in the hot compressed air will cause an accumula-
tion of a carbon-like residue on the working parts. If the valve has
heavy carbon build-up, it should be replaced. Use the following
procedure to inspect, clean or replace the check valve.
1. Remove and lock out power from the compressor. Release any
air pressure from the air tank.
2. Loosen the top and bottom outlet tube nuts and remove the
outlet tube.(Refer to your Parts Manual for parts indentification)
3. Unscrew the check valve (turn counterclockwise) using socket
wrench (7/8").
4. Check that the valve disc moves freely and that the spring
holds the disc in the upper, closed position. The check valve
may be cleaned with a solvent.
5. Apply sealant to the check valve threads. Reinstall the check
valve (turn clockwise). DO NOT OVERTIGHTEN.
6. Replace the outlet tube and tighten top and bottom tube nuts.
DO NOT OVERTIGHTEN.
Safety Valve - Inspection and Replacement
IF THE SAFETY VALVE DOES NOT WORK PROP-
ERLY, OVER-PRESSURIZATION MAY OCCUR CAUS-
ING AIR TANK RUPTURE OR EXPLOSION. DAILY
PULL THE RING ON THE SAFETY VALVE TO MAKE
SURE THAT THE SAFETY VALVE OPERATES
FREELY. IF THE VALVE IS STUCK OR DOES NOT
OPERATE SMOOTHLY, IT MUST BE REPLACED
WITH A VALVE HAVING THE SAME PRESSURE
RATING.
1. Remove and lock out power from the compressor. Release any
air pressure from the air tank.
2. Remove safety valve and replace with valve of the same pressure
rating.
3. Apply thread sealant to new safety valve and tighten. DO NOT
OVERTIGHTEN.
Belt - Replacement
SERIOUS INJURY OR DAMAGE MAY OCCUR IF
PARTS OF THE BODY OR LOOSE ITEMS GET
CAUGHT IN MOVING PARTS. NEVER OPERATE
THE OUTFIT WITH THE BELT GUARD REMOVED.
THE BELT GUARD SHOULD BE REMOVED ONLY
WHEN THE COMPRESSOR IS UNPLUGGED.
1. Remove and lock out power from the compressor.
2. Remove beltguard screws and beltguard.
3. Remove belt and replace.
NOTE
The belt must be centered over the grooves
on the flywheel and motor pulley.
4. To reinstall beltguard, align the bottom tabs of the beltguard into
the slots of the base. These are located behind the ON/OFF
switch. Replace beltguard screws and tighten securely.
Belt Guard - Removal and Installation
Remove and lock out power from the compressor. Release any
air pressure from the air tank.Remove and lock out power from the
compressor. Release any air pressure from the air tank.
1. Move the “ON/AUTO-OFF” lever to the “OFF” position. Remove
and lock out power from the compressor. Release all air tank
pressure.
2. Remove the beltguard screws and remove beltguard.
3. To reinstall beltguard, align the bottom tabs of the beltguard into
the slots of the base. These are located behind the ON/OFF
switch. Replace beltguard screws and tighten securely.