


7
Planing (Fig. 1, 7)
CAUTION: Risk of property damage. Allow the tool to reach full speed before
touching tool to the work surface. Lift the tool from the work surface before turning
the tool off.
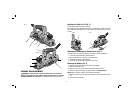
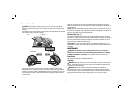
Hold the planer in the correct position with one hand on the front handle and the other
on the auxiliary handle, as shown in Figure 7.
CORRECT
INCORRECT INCORRECT
FIG. 7
Place the front of the shoe on the surface to be planed, making certain that the
cutting blades are not touching the surface. Push down firmly on the front handle of
the planer so that the front shoe is ABSOLUTELY FLAT on the work surface. Turn the
tool on and allow the motor to reach full speed before touching the planer blades to
the work surface.
Move the tool slowly into the work and maintain downward pressure to keep the
planer flat. Be particularly careful to keep the tool flat at the beginning and the end of
the work surface.
Planing Tip: For a smoother appearance, fasten a piece of scrap wood to the end of
the piece you are planing. Don’t stop planing until the cutting blades of the planer are
past your work piece and into the scrap material.
Parking Foot (Fig. 1)
Your planer is equipped with a parking foot (K) that automatically lowers into place
when the tool is lifted from the work surface. When planing, the parking foot raises as
the tool is pushed forward. When the parking foot is lowered, the planer can set on
the work surface without the blade touching.
CAUTION: Do not lock the trigger switch on and engage the parking foot. The
vibration of the running motor will cause the planer to move, possibly falling from the
work piece.
MAINTENANCE
WARNING: To reduce the risk of serious personal injury, turn tool off and
disconnect tool from power source before making any adjustments or removing/
installing attachments or accessories. An accidental start-up can cause injury.
Lubrication
Your power tool requires no additional lubrication.
Cleaning
WARNING: Blow dirt and dust out of all air vents with clean, dry air at least once
a week. To minimize the risk of eye injury, always wear AS/NZS1337 approved eye
protection when performing this.
WARNING: Never use solvents or other harsh chemicals for cleaning the
non-metallic parts of the tool. These chemicals may weaken the plastic materials
used in these parts. Use a cloth dampened only with water and mild soap. Never let
any liquid get inside the tool; never immerse any part of the tool into a liquid.