


. CHECK DAMAGED PARTS. Before further use of the tool, a guard
or other part that is damaged should be carefully checked to
determine that it will operate properly and perform its intended
function. Check for alignment of moving parts, binding of moving
parts, breakage of parts, mounting, and any other conditions that
may affect its operation. A guard or other part that is damaged
should be properly repaired or replaced by an authorized service
center unless otherwise indicated elsewhere in this instruction
manual. Have defective switches replaced by authorized service
center. Do not use tool if switch does not turn it on and off.
. CAUTION: When drilling or driving into walls, floors or wherever live
electrical wires may be encountered, DO NOT TOUCH ANY METAL
PARTS OF THE TOOL! Hold the tool only by insulated grasping
surfaces to prevent electric shock if you drill or drive into a live wire.
SAVE THESE INSTRUCTIONS
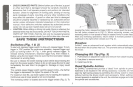
Switches (Fig. 1 & 2J
To start unit, depress trigger switch; to stop unit, release trigger. To lock
trigger in "ON" position for continuous operation, depress trigger and
push up locking button "A" Fig. 1, then gently release trigger~ To
release locking mechanism, depress trigger fully, then release it.
Before using the tool (each time) be sure that the lock button release
mechanism is working freely.
Be sure to release the switch locking button before disconnecting the
plug from the power supply. Failure to do so will cause the tool to start
immediately the next time it is plugged in. Damage or injury could
result.
The variable speed trigger switch permits speed contro-the farther
the trigger is depressed, the higher the speed of the unit.
For maximum tool life, use lower speed only for starting the fastener.
Continuous use at lower speed is not recommended.
The reversing switch is located above the trigger switch (Fig. 2). To
-===
reverse the motor, release the trigger FIRST and then push the lever to
the left (when viewed as in Fig. 2). When removing screws, use
reversing switch in low speed to keep bit seated firmly inscrew head.
After any reversing operations, return switch to forward position by
pushing it to the right (when viewed as in Fig'. 2).
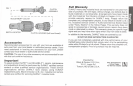
Brushes
DEWALT uses an advanced brush system which automatically stops
the tool when the brushes wear out. This prevents serious damage to
the motor.
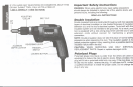
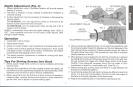
Changing Bit Tip (Fig. 3J
1. Pull forward on adjustment collar and remove from clutch housing:
2. Use pliers to remove worn bit.
3. Install new bit tip.
Dead Spindle Action
All DEWALT screwdrivers provide a "dead" front spindle to permit
fasteners to be located in the driving accessory. Clutches are held
apart by light spring pressure permitting the driving clutch to rotate
without turning the driven clutch and accessory. When sufficient
forward pressure is applied to the unit, the clutches engage and rotate
the spindle and accessories.
2