


8
WARNING: Before connecting the table saw to the power source or operating the
saw, always inspect the guard and splitter for proper alignment and clearance with saw
blade. Check alignment after each change of bevel angle.
Ripping Small Pieces
It is unsafe to rip small pieces. It is not safe to put your hands close to the blade.
Instead, rip a large piece to obtain the desired piece. When a small width is to be
ripped and the hand cannot be safely put between the blade and the rip fence, use one
or more push sticks. Use them to hold the workpiece against the table and fence, and
push the workpiece against the table and fence, and push the workpiece fully past the
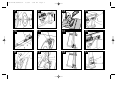
blade. See Fig. 22.
Crosscutting
1. Remove the rip fence and place the mitre gauge in the desired slot.
2. Adjust the blade height so that the blade is about 1/8 (3.2 mm) higher than the
top of the workpiece.
3. Hold the workpiece firmly against the mitre gauge with the path of the blade in
line with the desired cut location. Keep the workpiece an inch or so in front of the
blade. KEEP BOTH HANDS AWAY FROM THE BLADE AND THE PATH OF
THE BLADE.
4. Start the saw motor and allow the blade to come up to speed.
5. While using both hands to keep the workpiece against the face of the mitre
gauge, and holding the workpiece flat against the table, slowly push the
workpiece through the blade. See Fig. 23.
6. Never try to pull the workpiece with the blade turning. Turn the switch OFF, allow
the blade to stop, and carefully slide the workpiece out.
CAUTION: Never touch or hold onto the “free” or “cut off” end of the workpiece.
Bevel Crosscutting
This operation is the same as crosscutting except that the bevel angle is set to an
angle other than 0°.
WARNING: Before connecting the table saw to the power source or operating the
saw, always inspect the guard and splitter for proper alignment and clearance with saw
blade. Check alignment after each change of bevel angle.
Mitreing
This operation is the same as crosscutting except the mitre gauge is locked at an
angle other than 0°. Hold the workpiece FIRMLY against the mitre gauge and feed the
workpiece slowly into the blade (to prevent the workpiece from moving). See Fig. 23.
MITRE GAUGE OPERATION
To set your mitre gauge, loosen the lock handle and move the mitre gauge to the
desired angle. The mitre gauge has set stops and 90° and 45° left and right. To rotate
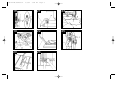
the mitre gauge beyond these stops, flip the stop plate up, as shown in Fig. 21.
Compound Mitreing
This is a combination of bevel crosscutting and mitreing. Follow the instruction for both
bevel crosscutting and mitreing.
Dado Cutting
CAUTION: Do not attempt to stack dado blades thicker than 13/16”
(20 mm). Do not use dado blades larger than 8” (200 mm) diameter. Since
dado cuts are not through cuts, the cuts must be performed with the blade
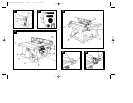
guard removed. To remove the blade guard, loosen the two bolts shown in Fig.
10 and remove the guard assembly.
When using the dado, (sold as an accessory) the special dado insert (also sold as an
accessory) must be used.
Any time a cut is required that is considerably wider than the saw kerf, a dado is used.
A dado cut is commonly used to add support and line up a shelf for a cabinet,
bookcase or some such project. When using the dado, the guard must be removed.
Use EXTREME care when using the dado without the guard. If a deep cut is required
use several successive passes rather than attempting to make it with one pass.
Maximum dado width on this saw is 13/16” (20 mm). DO NOT USE WIDER
COMBINATIONS.
CAUTION: Always check dado blade clearance before plugging in the saw.
Be sure to place the guard back in position and check adjustments when the dado cuts
are complete.
DW744-XE/387486-01 5/1/02 3:44 PM Page 10