


2
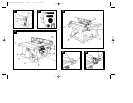
Description Fig. 2
Figure 2 shows all the loose items and
hardware packed with the saw.
1. Rip fence
2. Blade (attached to saw base)
3. Arbor wrench and spindle wrench
(attached to saw base)
4. Blade guard
5. Throat plate
6. Mitre gauge
Description Fig. 3
1. Table
2. Screw-down holes
3. Mitre gauge
4. Mounting holes
5. ON-OFF switch
6. Rail lock lever
7. Bevel lock lever
8. Blade height adjustment wheel
9. Fine adjust knob
10. Rip scale indicator
Description Fig 4.
1. Blade guard
2. Work support extension (retracted)
3. Blade/wrench storage
4. Dust exhaust
5. Rip fence latch
6. Anti-kickback teeth
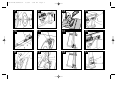
Description Fig. 5
1. Pin
2. Opening
Description Fig. 7
1. Spindle
2. Inner washer
3. Blade
4. Outer washer
5. Arbor nut
Description Fig 7A
1. Torx head bolts
2. Rear pivot bracket
3. 10mm hex bolts
4. Rear pinion bearing assembly
5. Saw shown upside down for clarity
Description Fig. 8
1. Arbor wrench
Description Fig. 9
1. Rail lock lever
Description Fig. 10
1. Shims
2. Bolts
Description Fig. 11
1. Edge of splitter
Description Fig. 15
1. Fine adjust knob
Description Fig. 16
1. Screws
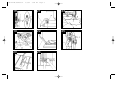
Description Fig. 17
1. Padlock insertion hole
2. ON-OFF Switch
Description Fig. 18
1. Belville washers
2. Nut
3. Gap
Description Fig. 19
1. Bevel stop cam
2. Bevel stop screw
3. Pointer screw
Description Fig. 21
1. Lock handle
2. Stop plate
3. Adjusting screw
4. Nut
Description Fig. 22
1. Push stick
Description Fig. 24
1. Dust access door
2. Hair pin cotters
3. Central dust cover scew
Description Fig. 25
1. Height adjustment threads
Additional Safety Rules for Table Saw
WARNING: For your own safety, do not operate your saw until it is completely
assembled and installed according to the instructions and until you have read and
understood the following :
• All Safety Rules
• Assembly Procedures
• Operating Controls
• Adjustment Procedures
• Basic Operations
• KEEP guards in place and in working order.
• STABILITY. Make sure table saw is firmly mounted before use.
• MINIMISE ACCIDENT POTENTIAL. Most accidents are caused by failure to
follow setup and operating instructions.
• AVOID awkward hand positions, where a sudden slip could cause a hand to
move into a saw blade or other cutting tool. Never reach in back of, or around, the
cutting tool with either hand to hand down the workpiece. DO NOT PLACE
FINGERS OR HANDS IN THE PATH OF THE SAW BLADE.
• NEVER reach under your machine when operating or make any adjustments
when it is running.
• SHUT OFF the saw and disconnect the power cord when removing the table
insert, changing the cutting tool, removing or replacing the blade guard, or making
adjustments.
• ALWAYS maintain control of the workpiece. DO NOT let go of the workpiece until
it is well clear of the cutting tool.
• WHEN REMOVING short workpieces, or cleaning up around the table, be sure
the saw is in the OFF position and blade has stopped turning.
• NEVER turn the saw ON before clearing the table of all tools, wood scraps, etc.,
except the workpiece and related feed or support devices for the operation
planned.
• WHEN changing saw location, disconnect power.
• USE extra caution when the guard assembly is removed for resawing, dadoing,
rabbeting, or moulding. Replace the guard as soon as that operation is
completed.
• NEVER hold onto or touch the “free end” of the workpiece or a “free piece” that is
cut off, while power is ON and/or the saw blade is rotating.
DW744-XE/387486-01 5/1/02 3:44 PM Page 8