


English
5
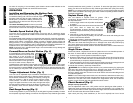
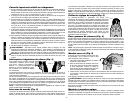
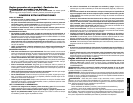
between jaws to engage screw head. Remove screw by turning clockwise (left-hand-
thread). Place hex key in chuck and tighten, as shown. Using a wooden mallet or similar
object, strike key sharply in the counterclockwise direction. This will loosen the chuck so
that it can be unscrewed by hand.
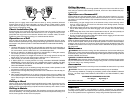
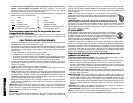
Chuck Installation (Fig. 6)
Screw the chuck on by hand as far as it will go and insert screw (LH thread). Tighten screw
securely. Tighten the chuck around the shorter end of a 1/4” or larger hex key (not sup-
plied) strike the longer end in the clockwise direction with a wooden mallet, as shown.
Tighten the screw once again by turning in a counterclockwise direction.
Operation as a Drill
Turn the collar to the drill bit symbol. Install and tighten the desired drill bit in the chuck.
Select the desired speed/torque range using the dual range gear shifter to match the speed
and torque to the planned operation. Follow these instructions for best results when drilling.
DRILLING
1. Use sharp drill bits only. For WOOD, use twist drill bits, spade bits, power auger bits, or
hole saws. For METAL, use high speed steel twist drill bits or hole saws. For MASON-
RY, such as brick, cement, cinder block, etc., use carbide-tipped bits.
2. Be sure the material to be drilled is anchored or clamped firmly. If drilling thin material,
use a “back-up” block to prevent damage to the material.
3. Always apply pressure in a straight line with the bit. Use enough pressure to keep the
drill bit biting, but do not push hard enough to stall the motor or deflect the bit.
4. Hold tool firmly to control the twisting action of the drill.
5. IF DRILL STALLS, it is usually because it is being overloaded. RELEASE TRIGGER
IMMEDIATELY, remove drill bit from work, and determine cause of stalling. DO NOT
CLICK TRIGGER OFF AND ON IN AN ATTEMPT TO START A STALLED DRILL –
THIS CAN DAMAGE THE DRILL.
6. To minimize stalling as you are breaking through the material, reduce pressure on drill
and ease the bit through the last fractional part of the hole.
7. Keep the motor running when pulling the bit back out of a drilled hole. This will help pre-
vent jamming.
8. With variable speed drills there is no need to center punch the point to be drilled. Use
a slow speed to start the hole and accelerate by squeezing the trigger harder when the
hole is deep enough to drill without the bit skipping out. Operate at full on after starting
the bit.
Drilling in Wood
Holes in wood can be made with the same twist drills used for metal. These bits may over-
heat unless pulled out frequently to clear chips from the flutes. For larger holes, use low
speed wood bits. Work that is likely to splinter should be backed up with a block of wood.
Drilling in Metals
Use a cutting lubricant when drilling metals. The exceptions are cast iron and brass which
should be drilled dry. The cutting lubricants that work best are sulphurized cutting oil or
lard oil; bacon grease will also serve the purpose.
Drilling Masonry
Use carbide tipped masonry bits at high speeds. Keep even force on the drill but not so
much that you crack the brittle materials. A smooth, even flow of dust indicates the prop-
er drilling rate.
Operation as a Hammerdrill
Some models have the Hammerdrill feature. To utilize the hammer feature of your tool,
rotate the collar to align the hammer symbol with the arrow shown in FIG.4. The hammer-
ing position is for hammer drilling in soft concrete and masonry such as brick, mortar and
soft ceramics.
1. When drilling, use just enough force on the hammer to keep it from bouncing exces-
sively or “rising” off the bit. Too much force will cause slower drilling speeds, overheat-
ing, and a lower drilling rate.
2. Drill straight, keeping the bit at a right angle to the work. Do not exert side pressure on
the bit when drilling as this will cause clogging of the bit flutes and a slower drilling
speed.
3. When drilling deep holes, if the hammer speed starts to drop off, pull the bit partially out
of the hole with the tool still running to help clear debris from the hole.
4. Do not pour water into the hole to settle dust. Water causes clogging of bit flutes which
will tend to make the bit bind in the hole.
Operation as a Screwdriver
Select the desired speed/torque range using the dual range gear shift lever on the top of
tool to match the speed and torque to the planned operation. Insert the desired fastener
accessory into the chuck as you would any drill bit. Set the torque adjustment collar (FIG.
4). Make a few practice runs in scrap or unseen areas to determine the proper position of
the clutch collar.
Maintenance
CLEANING: With the motor running, blow dirt and dust out of all air vents with dry air
at least once a week. Wear safety glasses when performing this. Exterior plastic parts may
be cleaned with a damp cloth and mild detergent. Although these parts are highly solvent
resistant, NEVER use solvents.
CHARGER CLEANING INSTRUCTIONS
WARNING: Disconnect the charger from the AC outlet before cleaning.Dirt and grease
may be removed from the exterior of the charger using a cloth or soft non-metallic brush.
Do not use water or any cleaning solutions.
Accessories
Recommended accessories for use with your tool are available at extra cost from your local
service center.
CAUTION: The use of any non-recommended accessory may be hazardous.
If you need any assistance in locating any accessory, please contact DEWALT Industrial
Tool Co., 701 East Joppa Road, Baltimore, MD 21286 or call 1-800-4-D
EWALT (1-800-
433-9258).
MAXIMUM RECOMMENDED CAPACITIES
Low Range- 1 High Range- 2
BITS, METAL DRILLING 1/2" 1/4"
WOOD, FLAT BORING 1 1/2" 5/8"
BITS, MASONRY DRILLING - 1/4”
Important
To assure product SAFETY and RELIABILITY, repairs, maintenance and adjustment
(including brush inspection and replacement) should be performed by certified service cen-
ters or other qualified service organizations, always using identical replacement parts.
4
3
5
4
3
5
FIG. 6
FIG. 5