


DL5000 INSTRUCTION MANUAL
Before You Begin
Read and follow all instructions carefully.
• After unpacking all components, assemble band saw on a firm level surface to prevent saw from tilting
and rocking.
• Be sure the power switch is in the OFF position before plugging in the band saw.
• Always disconnect band saw from electrical outlet before setting up or servicing.
• Wear proper apparel. Never wear loose fitting clothes, neckties, jewelry and gloves that may get caught in
moving parts.
• Remove all wrenches before using band saw. Leaving wrenches attached while operating this tool may
result in damage to the machine and/or operator.
• Always wear safety goggles. Everyday eyeglasses have only impact resistant lenses; they are not
safety glasses.
• Never turn on band saw while glass or working materials are touching the blade.
• Always hold material being cut firmly on cutting table.
• Feed materials at a slow easy pace into the blade. Avoid sudden twisting of the blade, which may cause
kinking or breaking.
• Keep out of reach of children.
• Never leave saw running unattended. Turn power OFF when not in use.
• Do not operate while under the influence of medication or alcohol.
• To ensure top performance keep band saw properly maintained.
Contents
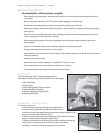
Your Diamond Laser 5000
™
has been shipped partially
assembled. Carefully remove saw and parts from the packaging.
1-Band Saw Body
2-Cutting Table
3-Recirculating Water Pump and Valve
4-Detachable Water Reservoir
5-Straight Edge/Angle Cutting Guide
6-Adjusting Wrenches
Assembly Instructions
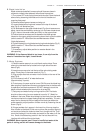
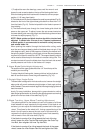
A. Table Installation
1) Remove table mounting set screws and washers from
the table mounting block directly behind the blade (Fig.1).
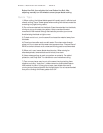
Loosen and remove the table alignment screw and wingnut located on the
front of the cutting table blade slot (Fig.2).
2) While holding the table with the slot opening directly behind the blade,
carefully slide the diamond blade through the slot.
3) Secure cutting table to the mounting block with the table mounting set
screws. Return alignment screw to the front of the cutting table
and tighten in place with the wingnut positioned under table.
- PAGE 1
Fig.1
1.
2.
3.
4.
5.
6.