


DL5000 INSTRUCTION MANUAL
PAGE 2 -
Table Alignment Screw
Fig.2
Fig.3
Fig.5
Fig.6
Fig.7
Fig.4
Fig.8
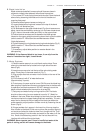
B. Blade Installation
Blade comes preinstalled; however should it become loose in
shipment or need to be replaced, follow these instructions.
1) Turn power OFF and unplug from electrical outlet. Open the band
saw cover by loosening the knobs on the front of the saw and
removing front panel.
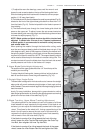
2) Remove table alignment screw and wing nut.
3) Loosen blade tensioning knob, located at the top of the band
saw (Fig.3) until blade has give.
4) Pull downward on the upper blade wheel (Fig.4) and remove worn
blade. Install the new blade by centering it on the lower blade wheel
(Fig.5), then on the center wheel and finally on the upper wheel.
5) Ensure blade is centered and fits between the blade guides
located on the upper guide block and the lower block under the table.
(refer to section D - Band Saw Use and Maintenance: Blade
Guide Adjustment).
6) Tighten blade by turning blade tensioning knob clockwise (Fig.3)
(refer to section C - Band Saw Use and Maintenance: Blade
Tensioning).
7) If necessary, adjust table position to recenter blade in the
table opening.
WARNING: If the diamond blade is too loose, it can slip from the
wheels. If stretched too tight, it could break.
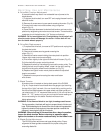
C. Water Systems
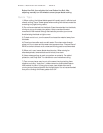
1) Place the water reservoir on a solid level work surface. Place
reservoir underneath the lip located on the right side of the saw
base (Fig.6).
2) Insert brass pump valve into the top of the recirculating water
pump. Place pump in the water reservoir (Fig.7).
3) Plug pump’s electrical connector into the outlet on the rear of the
saw (Fig.8).
5) Fill the reservoir with 2” of water before use
(Approximately 3 quarts).
6) To test pump, the saw must be turned ON. Be sure the blade has
been properly installed and there are no obstructions to interfere with
its operation and blade movement. DO NOT attempt to touch the
blade or blade wheels while the machine is turned ON.
7) Test pump and water flow by turning machine ON. The blade
should not be moving; be sure reostat is turned to “0”. Watch for
bubbles in the hose. Water should begin to flow freely from the water
nozzle mounted on the upper blade guide block assembly. To insure
water flow is directed at the front edge of the blade just below the
guide assembly, adjust position of water nozzle by loosening the set
screw (Fig.9).
8) If large pockets of air appear in the hose line, this may stop the
flow of water to the blade. If this occurs, prime the pump by tipping it
on its side and allow the intake to draw in air through the line. Then
return the intake grill into the water and watch for the water to fill the
line. Small air bubbles may persist in the line but these will not
interfere with sufficient flow to the blade.
WARNING: Never operate saw if there is insufficient water at the
point of cutting, as this will cause damage to the blade.