


WR44 Series Installation Guide
12
3 Configuration
Once the router has been installed and powered up, it needs to be configured to
communicate with the LAN and WAN. The easiest way to do this is via the router’s Web
pages which are accessible with a web browser such as Internet Explorer or Firefox.
Note: The default IP address for the LAN 0 port is 192.168.1.1 with a subnet mask of
255.255.255.0. The router has a DHCP server enabled by default which should assign an
appropriate IP address to your PC. Care should be taken that the IP address does not
conflict with other routers that may already be connected to the network.
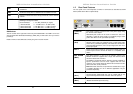
Step 1 – Connect to the Router’s Web pages
Open up your Web browser and enter 192.168.1.1 into the address bar. This will load the
router’s login page. If you are unable to connect to the router’s Web pages, please refer to
the troubleshooting section.
In order to log in, you need to enter a username and password. The default username is
“username”, the default password is “password”. After you have logged in, you should see
the router’s home page.
Step 2 – Configure the router
You can now configure the router using the various Web pages under the Configuration
menu on the left hand side of the home page.
There are also a number of configuration wizards which can be accessed via the Wizards
menu on the left hand side of the home page. These will step you through various types of
configuration.
Please refer to the Digi Transport User Guide for information on the various configuration
parameters. The User Guide can be downloaded from the Digi website support section.
Note: Most configuration changes take immediate effect when the OK button on a web
page is clicked, a reboot is not required.
Important Information
On any configuration using a Wireless WAN interface (such as GPRS/HSDPA/CDMA) it is
essential that some kind of dead link detection mechanism is configured. Please see
application note 7 on the Digi support web site.
WR44 Series Installation Guide
13
Troubleshooting
Unable to load router’s web configuration pages
Ensure that the LAN cable is fitted into the LAN 0 port and that the LAN 0 status indicator
on the front of the router is lit. If it is not, then there is a problem with either the LAN cable
or the device it is connecting to.
If the status indicator is lit, check that the PC can communicate with the router. On the
PC, open the Command Prompt window and enter the command “ping 192.168.1.1”.
If you do not get a response to the pings, then the problem could be one of the following:
1. The router’s IP address has already been changed from 192.168.1.1 to something
different. Try using the Digi Transport Connection Wizard (which can be
downloaded from the Digi website at www.digi.com. It can usually discover Digi
Transport routers on a network as long as the router’s firewall has not been
enabled.
2. PC IP configuration. The PC’s LAN interface that is connected to the router should
be configured to “Obtain an IP address automatically”. If required, the Digi
Transport Connection Wizard can be used to configure the PC.
3. Check the PC’s LAN connection and any LAN device (e.g. Ethernet switch) that is
used to interconnect to the router.
4. ARP resolution. Try clearing the PC’s ARP cache with the command “arp –d *”, then
retry the ping command.
If you do get a response to the pings but are unable to view the configuration web pages,
then there is most likely a problem with your web browser configuration.
Unable to log in
Access to the router can be achieved via any of the asynchronous serial ports on the
router. Connect your PC to the router using a “straight through” serial cable.
This will allow you to change the configuration via the Command Line Interface (CLI).
Please refer to the Digi Transport User Guide for information on how to use the CLI. The
User Guide can be downloaded from the Digi website support section.