


OPERATION AND USE
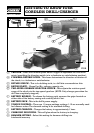
BATTERY CHARGING
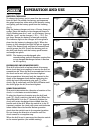
To charge the battery pack it must first be removed
from the drill. To release the battery pack squeeze
the grips located on either side of the battery casing
and gently pull the battery pack from the housing
(fig.1).
Plug the battery charger unit into a 13 amp, three-pin
socket. Place the battery in the charger as shown in
(fig.2). Making sure the + and - on the battery line up
with the + and - on the charger (+ T0 +, - T0 -). Do
not force. Ensure the battery is inserted correctly.
The indicator light on the charger will now glow to
show that the battery is charging (fig.3).When the
battery is fully charged the light will go out (approx.
1 hour). The battery pack can then be removed and
used to power the tool.To refit the battery pack to
the drill push firmly until the battery pack locates
and snaps into place.
NOTE: The battery was discharged after
manufacturing and will therefore require five
to ten charges/discharges before it reaches
its full capacity.
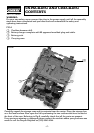
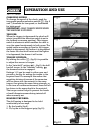
INSTALLING AND REMOVING BITS
This drill is fitted with a keyless chuck, this means
that a chuck key is not required to secure the drill or
screwdriver bit. Place the drill or screwdriver bit into
the chuck as far as it will go, then hand tighten.
Short screwdriver bits need only be inserted to the
depth of the hexagon shank before tightening the
chuck by hand. Alternatively grip part ✪✌ of the
chuck, (fig.4) and slowly run the drill clockwise until
the chuck grips the bit, then hand tighten.
DIRECTION SWITCH
This switch determines the direction of rotation of the
chuck, i.e. clockwise or anticlockwise.
To alter the direction of rotation stop the drill and
push ✮✌, (fig.5), switch to the left or right.When the
direction switch is in the 'F’ (forward) position the
chuck will rotate clockwise when viewed from the
handle end of the drill.When the switch is in the ‘R’
(reverse) position the chuck will rotate anticlockwise
when viewed from the handle. Before operation
check that the switch is set in the required position.
Do not change the direction of rotation until the
chuck comes to a complete stop.
When the drill is not in use move the direction switch
to the neutral position (the middle setting).
- 8 -
✪✌
Fig.2.
Fig.3.
Fig.4.
Fig.1.
✮✌
Fig.5.