


-11-
6<:7,=+<176
#!"&" "
8<176)4)++-;;7:A
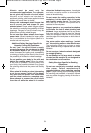
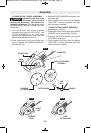
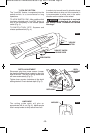
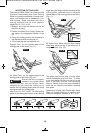
Your tool is equipped with a dust port for dust
extraction. To use this feature, insert dust
port adapter (optional accessory) into dust
port, attach vacuum hose into the adapter,
then connect the opposite end of the hose to
a shop vacuum cleaner (Fig. 3).
DUST PORT ADAPTER
(Optional accessory)
VACUUM HOSE
(Not included)
DUST
PORT
FIG. 3
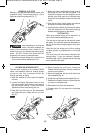
Thank you for purchasing the Dremel SM20.
This tool was designed to tackle a wide variety
of projects in and around the home. The
Dremel SM20 completes tasks quicker and
more efficiently than a series of other tools that
would be needed to complete a job or project.
This tool is also compact, ergonomic, and cuts
virtually all common materials.
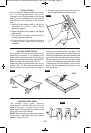
After using your new Dremel SM20 you’ll find
that it is the right size tool to get projects done
at just a fraction of the size of a traditional
circular saw. With a full line of accessories the
tool cuts through virtually any common material
in the home- wood, plastic, metal, drywall and
tile. The tool also features two cutting wheel
positions, one position using a standard flat
wheel for all your typical straight cuts and a
second position for making flush cuts along
flooring or against a wall.
In addition to versatility, the Dremel SM20
provides excellent line of sight for confident,
precise cuts so you will get accurate cuts the
first attempt and avoid wasting time or material.
Visit www.dremel.com to learn more about
what you can do with your new Dremel tool.
"#!
This Dremel SM20 tool is intended for straight
cuts in wood, plastic, metal, drywall, fiberboard,
and tile using the applicable accessories
recommended by Dremel.
8-:)<16/6;<:=+<176;
Hold the tool with both hands
while starting the tool, since
torque from the motor can cause the tool to twist.
Start the tool before applying to work and let
the tool come to full speed before contacting
the workpiece. Lift the tool from the work
before releasing the switch. DO NOT turn the
switch “ON” and “OFF” while the tool is under
load; this will greatly decrease the switch life.
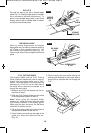
!%"%"
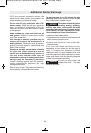
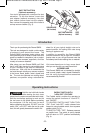
"#
The Paddle switch enables the operator to
control the switch functions of "Lock-OFF",
and "ON/OFF".
TO UNLOCK SWITCH AND TURN TOOL
"ON": Push "Lock-OFF" switch release lever
forward to unlock paddle switch, then squeeze
paddle switch (Fig. 4).
TO SWITCH TOOL "OFF": Release pressure
on paddle lever. The switch is spring loaded
and will return to "OFF" position automatically
(Fig. 4).
!
WARNING
DM 2610013190 06-11:DM 2610013190 06-11.qxp 6/6/11 10:43 AM Page 11