


-13-
#"!
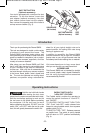
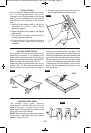
Maintain a firm grip and operate the switch with
a decisive action. Never force the tool. Use a
light and continuous pressure (Fig. 7).
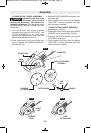
After completing a cut and the
switch has been released, be
aware of the necessary time it takes for the
wheel to come to a complete stop during coast
down. Do NOT set the tool down until the
accessory has come to a complete stop.
1. Make sure material being cut is secured in a
vise or fixture before attempting to cut
2. Keep your body positioned to either side of
the wheel, but not in line with the wheel. It is
important to support the tool properly and to
position your body such as to minimize body
exposure from possible wheel binding and
recoil.
3. Grip the tool firmly while cutting and always
be ready and able to manage the cut.
4. Avoid jamming, twisting or pinching the wheel
with the workpiece of otherwise applying
excessive side pressure to the wheel.
#"""
Make sure material being cut is secured in a
vise or fixture before attempting to cut.
Turn the tool on and wait for the wheel to reach
full speed. For cuts that extend to the edge of a
tile, cut all the way through edge(s) along your
cut line.
Score the tile first along your cut line, making
multiple passes to progressively cut through
the tile.
This tool does not use wheels designed for
face-grinding. If your cut requires a smooth,
finished edge, use an appropriate tile finishing
tool to refine the tile edge.
!
WARNING
# " #"!
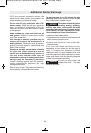
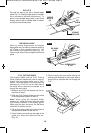
The size and versatility of the Dremel SM20
make it an excellent option for making plunge
or interior cuts into a workpiece such as
flooring, paneling, or siding.
1. Mark the surface to be cut with the desired
cut lines
2. Loosen the Depth Adjustment Lever so that
the spring loaded foot releases and goes to
the zero depth setting. Leave the Depth
Adjustment Lever loose during this cut.
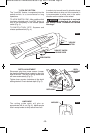
3. Rest the Foot of the tool on the workpieces
and Align the tool’s wheel with the cut line
(Fig. 8).
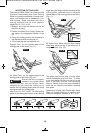
4. While holding the tool firmly, Press the
Paddle Switch and allow the tool’s wheel to
come up to full speed.
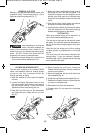
5. Slowly plunge/lower the tool and wheel into
the workpiece (Fig. 9).
6. Guide the tool forward and complete the cut
7. Release the Paddle Switch and allow the tool
to come to a complete stop.
8. Remove the tool from the workpiece.
9. Repeat steps 3-8 as required to complete
your cuts.
FIG. 10
FIG. 11
FIG. 9
DM 2610013190 06-11:DM 2610013190 06-11.qxp 6/6/11 10:43 AM Page 13