


8
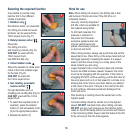
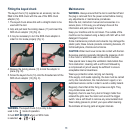
Auxiliary handle and depth gauge
1. Turn the auxiliary handle (9) anti-clockwise to loosen the
collar and slip it over the chuck onto the drill (Fig. A).
2. Insert the depth gauge (10) in the hole at the top of the
handle (9) (Fig. B).
A
B
3. The auxiliary handle (9) can be swivelled around 360°
to find the position that offers most comfort and the
easiest operation.
4. The depth gauge (10) helps keep an accurate depth
when drilling holes to a set depth.
5. To change the position of the depth gauge (10), turn the grip
of the handle (9) anti-clockwise until the depth gauge is loose
enough to slide in the hole.
6. Set the depth, checking the depth with a steel rule for
most accurate measurement (Fig. C).
7. Then turn the handle grip clockwise to tighten both
the depth stop and the auxiliary handle in the required
position (Fig. D).
C
D
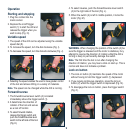
Installing and removing bits
CAUTION. Always ensure that the drill is switched off and
plug is removed from the power socket before installing or
removing drill bits.
The drill features an SDS-Plus
®
system which enables easy
and safe bit replacement.
Before inserting an SDS-Plus
®
bit always ensure that the bit
end is clean and greased.
1. Pull back the locking sleeve (11) and insert the bit into the
chuck opening taking care that the splines on the shaft of
the bit locate properly within the chuck (Fig. E).
2. Test for proper location by releasing the locking sleeve
(11) and giving the bit a sharp pull. If the bit can be
removed, again pull back the locking sleeve, rotate the bit
a fraction of a turn and re-insert it into the chuck (Fig. F).
E
F
3. Release the locking sleeve
and again test for proper
location. Repeat if necessary
until you are sure that the bit is
properly secured.
4. To remove the bit, pull back
the locking sleeve (11),
remove the bit, and release
the locking sleeve (Fig. G).
Note. Hammer action drilling is only possible with the drill
set for forward rotation.
G