


11
To increase the regulated air pressure rotate the pressure
regulating knob clockwise. To decrease the regulated air
pressure rotate the regulating knob anti-clockwise.
When setting the the regulated outlet pressure always start
with the pressure being low, working your way up to the
desired regulated pressure.
Note. Ifyou do not allow the air to discharge while you
are setting the regulator, the pressure as indicated on the
regulated outlet gauge will be incorrect. This gauge ONLY
indicates the correct pressure while air is being discharged
from the outlet and through the air tool/accessory to be used.
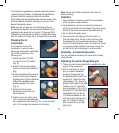
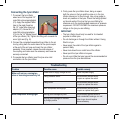
Stopping the air
compressor
On completion of using the
compressor, or when you are
leaving the compressor unattended,
turn off the compressor in the
following way:
1. Switch the yellow “On/Off”
(1) switch to the “off” position
(Fig. E).
2. Switch off the electrical power
supply and remove the electrical
plug.
3. Set the regulated outlet pressure
to zero by turning the pressure
regulating knob (9) anti clockwise
and set the regulated outlet
pressure gauge (12) to zero
(Fig. F).
4. Disconnect the air hose,
accessories and air tool from
the compressor.
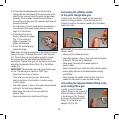
5. Pull the ring on the safety valve
(10) to ensure all the pressurised
air is released from the tank (Fig. G), or open the drain
cock (13) to release the pressure from the tank.
Note. Always shut off the compressor after use and
before servicing.
WARNINGS.
1. Never attempt to remove any part of the compressor
whilst the tank is under pressure.
2. Never attempt to remove any electrical component
whilst the compressor is connected to the power supply.
Switch off the power and remove the electrical plug.
3. Do not adjust the safety valve.
4. Take care when discharging air from the tank, i.e.
from the safety valve, the drain cock or the air outlet.
Compressed air can be extremely dangerous. Make
sure that the discharged air does not cause dust, stones
or any other foreign particles to be blown through the
air and that the air is discharged in a safe manner.
Assembly - Included Accessories
Your air compressor accessory kit comes with a variety
of accessories.
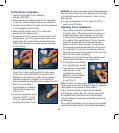
Operating the quick change blow gun
1. The air gun can be connected to the regulated air outlet
supply on the compressor.
2. Prior to connecting to the air
line, you need to assemble
the quick change blow gun.
To assemble select one of the
supplied 1/4” male Nitto style
plugs/adaptors (21). Apply the
supplied Teflon tape to the male
thread on the 1/4” male Nitto
style plug/adaptor (21) (Fig. H).
Screw the 1/4” male Nitto style
plug/adaptor (21) into the air
1/4” female threaded air inlet
side of the quick change blow
gun (15). Tighten this fitting
with a wrench for an air tight
seal (Fig. I).
E
F
G
H
I