


10
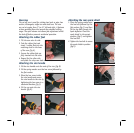
Turning on and off
1. Plug the cordset into the
mains socket.
2. Push the lock-off button and
pull the trigger to start the
tool (fig N).
3. To stop the tool release the
trigger switch.
4. When you release the trigger
switch, the machine turns off and the lock-off button
re-engages to prevent accidental operation.
WARNING. The cutting disc will continue to run down for
a short period of time after the trigger swich has been
released.
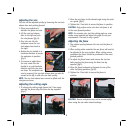
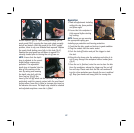
Replacing a cut off disc
CAUTION. Always ensure that the saw is switched off
and unplugged from the power supply before installing or
removing a disc.
1. Loosen and remove the spark shield locking knob (fig O).
2. Swing the front spark shield downwards and pull out
from the upper disc guard to reveal the cutting disc bolt
and flange (fig P).
3. Push the spindle lock lever to the right and rotate the
disc until the spindle lock engages (fig Q).
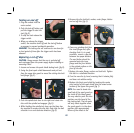
4. Whilst holding the spindle lock lever use the 8mm hex
key supplied to remove the disc bolt. Note that the bolt
unscrews in an anti-clockwise direction (fig R).
5. Remove the disc lock bolt, washer, outer flange, blotter
and cut off disc (fig S).
6. Clean any grinding dust from
the inner flange and, after
checking that it is in good
condition, mount a new disc
between two paper blotters.
The rear blotter should be
mounted onto the inner
flange and the front blotter
is the printed surface on the
front of the disc.
7. Replace the outer flange, washer and lock bolt. Tighten
the bolt in a clockwise direction.
8. Turn the new disc by hand, ensuring that it rotates fully
and does not wobble unduly.
9. Replace the front spark shield by locating the centre
pivot section of the spark shield into the raised centre
section of the upper disc guard (fig T).
NOTE. You need to locate the
small tab of the spark guard on
the inside of the wheel guard.
You may need to push this into
position over the head of the
disc locking bolt. The two parts
will only locate together when
the spark guard is in the down
position with approximately
80mm of the wheel at the
N
PO
RQ
S
T