


9
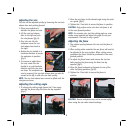
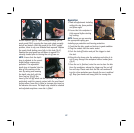
Adjusting the vice
The vice can be adjusted quickly by loosening the vice lock
release lever and pushing forward.
1. Place your workpiece in
between the fence and vice.
2. Lift the vice lock release
lever to the left and push
the vice forward (fig H).
3. Once the vice hits the
workpiece move the vice
lock release lever back to
the right.
4. Rotate the vice handle in a
clockwise direction to secure
the workpiece in position
(fig I).
5. To remove an object from
the vice, rotate the vice
handle in an anti-clockwise
direction until the vice jaws
are loose. The workpiece can
now be removed, the vice lock release lever can also be
moved to the left to slide the vice back quickly.
NOTE. The vice lock release lever cannot be lifted until the
vice jaws are loose.
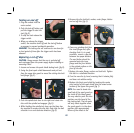
Adjusting the cutting angle
1. To change the cutting angle loosen the 2 hex screws
securing the fence using the 8mm hex key supplied
(fig J).
2. Move the rear fence to the desired angle using the scale
as a guide (fig K).
3. Tighten the 2 hex bolts to secure the fence in position.
CAUTION. Only perform mitre cuts when the fence is set
at the most forward position.
NOTE. For accurate cuts, test the cutting angle on some
similar scrap material and adjust the angle to suit your
requirements. The scale is only a guide.
Adjusting the fence
1. The original spacing between the vice and the fence is
175mm.
2. When cutting wider materials the rear fence will need to
be adjusted to the rear position. When cutting narrow
workpieces the fence should be positioned in the most
forward position.
3. To adjust the fence loosen and remove the two hex
bolts securing the fence using the 8mm hex key
supplied (fig L).
4. Move the fence backwards or forwards to one of the
other two fixing positions (fig M).
5. Tighten the 2 hex bolts to secure the fence in
position.
CAUTION. Narrow workpieces may not be secured safely
when using the two wider interval settings.
H
I
KJ
ML