


Adjustments
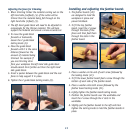
Adjusting the speed
1. Adjust the variable speed
dial (9) to suit different
material. The tool cuts
quicker and smoother at
different speeds and when
working in different woods
or in plastic or aluminium.
2. Adjust the variable speed
dial to a higher number for
faster speed or to a lower number for slower speed.
3. Determine the optimum speed by making a trial cut in
a scrap piece of material.
Note. Using the correct speed for the job increases the life
of the bit and can also affect the surface finish on the
material being cut.
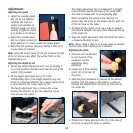
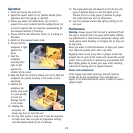
Adjusting the depth of cut
1. Loosen the height adjustment lock (14) by rotating it
in an anti-clockwise direction using the rear end of the
wrench (18) provided.
2. Fit the height adjustment tool (17) in the
corresponding slots of the height adjusting ring and
rotate in a clockwise direction for a deeper depth of cut
or anti-clockwise for a lower depth of cut.
2. The height adjustment ring is marked with arrows
showing the direction to turn the adjusting ring to
raise or lower the cutter.
2. The height adjustment ring is marked with a straight
arrow pointing towards the edge of the metal table.
The table is marked with 10 corresponding lines.
2. When completing the setting of the depth of cut,
always align the arrow on the height adjuster with one
of the ten lines on the table.
3. To determine the depth of cut use a ruler to measure
the distance between the base of the table and the tip
of the router bit.
4. Align the height adjustment lock and rotate the lock in
a clockwise direction to lock.
Note. Always make a trial cut in a scrap piece of material
to ensure the correct depth of cut is selected.
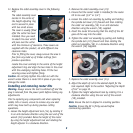
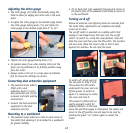
Adjusting the fence
1. The fence can be adjusted
to suit the size of the
workpiece and the
application being
performed.
2. Loosen the 2 fence locking
knobs (5) at the rear of
the fence.
3. Slide the fence backwards or forwards to the desired
position. Use the gauge on the table as a guide to
indicate the distance from the fence to the centre of
the router bit.
4. Tighten the 2 fence locking knobs (5) at the rear of
the fence to secure the fence in position.
10