


OPERATING PROCEDURES
DRY SYSTEM CHECKOUT
This is an initial checkout to find if the system setup is complete. Conduct the dry system checkout without
material in the system.
Attach the pneumatic pressure lines from the dispense valve to the air supply controller.
Turn on the electric and air supply.
Set the air pressure to 70 psi (4.8 bar) on the system pressure gauge.
Momentarily press the controller’s Dispense Valve cycling control switch. The metering rod should
immediately stroke downward (the time delay must be set to allow a complete downward stroke). After the
timer delay the metering rod should retract.
When this happens, the system installation is correct.
WET SYSTEM CHECKOUT
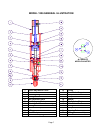
Attach the primed material line from the reservoir to the 1/8” NPTF material inlet port on the side of the
1206 Dispense Valve.
Attach the air line to the regulator and set the air pressure control to the setting required for the application.
Begin with material pressure set at 15 psi (1.0 bar) and gradually increase material pressure until material
feeds through the valve.
Note: When utilizing a remote reservoir, the reservoir, delivery tubing, and fittings must be compatible with
the material being dispensed and capable of withstanding the dispensing pressure.
WARNING: Do not apply air pressure to the Dispense Valve or Feed System unless all screws, air
connections, and the reservoir are in place and fastened securely. Do not exceed 100 psi (6.9 bar) material
inlet pressure. Higher pressures are not required and may cause a serious hazard. If your system uses a
syringe feed; do not exceed 60psi (4.1 bar) air pressure to the syringe inlet.
Cycle the dispense valve several times, adjusting the material pressure until the desired shot size is
repeatable.
NOTE: An air bubble in the 1206 could stop thin liquids from dispensing --1) hold your fingertip over the
check-valve end for a couple of cycles; 2) if this doesn’t help, point the check-valve end upward and away
from people and cycle a couple of times.
Page 5