


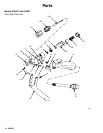
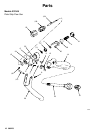

6 308253
Operation
Pressure Relief Procedure
WARNING
SKIN INJECTION HAZARD
The system pressure must be manually
relieved to prevent the system from
starting or spraying accidentally. Fluid
under high pressure can be injected through the
skin and cause a serious injury. To reduce the risk
of an injury from injection, splashing fluid, or mov-
ing parts, follow the Pressure Relief Procedure
whenever you:
D are instructed to relieve the pressure,
D stop dispensing,
D check or service any of the system equipment,
D or install or clean the nozzle.
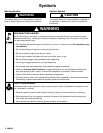
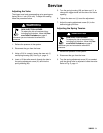
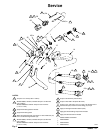
1. Fully release the gun trigger and lock the gun
trigger safety by rotating the safety forward. See
Fig. 1.
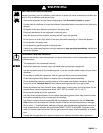
2. Shut off the fluid supply pump.
3. Hold a metal part of the gun firmly to the side of a
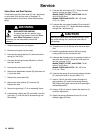
grounded metal waste container. Unlock the gun
trigger safety by rotating the safety backward. See
Fig. 2. Trigger the gun to relieve fluid pressure.
4. Fully release the gun trigger and lock the gun
trigger safety by rotating the safety forward.
5. Open the pump drain valve to help relieve fluid
pressure in the pump, hose, and gun. Triggering
the gun to relieve pressure may not be sufficient.
Have a container ready to catch the drainage.
6. Leave the drain valve open until you are ready to
dispense again.
7. If you think that the gun nozzle or fluid hose is
completely clogged or that pressure has not been
fully relieved after following the steps above, very
slowly loosen the hose end coupling and relieve
pressure gradually, then loosen the coupling
completely. Clear the nozzle or hose obstruction.
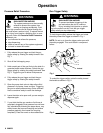
Gun Trigger Safety
WARNING
SKIN INJECTION HAZARD
To prevent accidental triggering of the
gun and reduce the risk of a serious
injury, including fluid injection or splash-
ing in the eyes or on skin, lock the gun trigger
safety when you stop dispensing.
To lock the gun safety, release the trigger and rotate
the safety toward the trigger as shown in Fig. 1.
NOTE: Do not try to force the trigger valve open with
the safety engaged. This could result in component
failure.
Fig. 1
01610
A
Locked
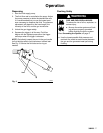
To unlock the trigger safety, rotate the safety toward
the handle as shown in Fig. 2.
Fig. 2
Unlocked
01610
A