


10
308-457
Flushing
I. When to flush.
D Before
the first time use
D
When changing colors
D
Before fluid can dry or settle out in a dormant sys
-
tem (observe the recommended fluid pot life on cat
-
alyzed fluids)
D
Before storing the system
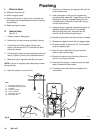
II. How to flush.
See
Fig. 6.
1.
Relieve pressure. See page 8.
2.
Remove the air cap and spray tip before flushing.
3.
Unscrew the fluid filter (5) bowl. Remove the
screen. See manual 307–273. Reinstall the bowl
without the screen.
4.
Put the suction tube into a grounded metal pail with
about 1/2 gallon (2 liters) of a compatible solvent.
5.
Make sure the air regulators (8a,8b) are closed.
NOTE:
The gun air regulator (8b) always stays closed
during flushing.
6.
Open the master air valves (A,14).
7.
Slowly turn on the pump air regulator (8a) until the
pump cycles slowly
.
8.
Hold a metal part of the gun firmly against the
grounded metal waste pail. T
rigger the gun. Slowly
increase the pump air regulator setting until the
fluid flows freely
. (Some air will spit from the gun
until the fluid arrives.)
9.
Keeping the gun triggered, decrease the pump air
regulator (8a) pressure as much as possible
without stalling the pump, and pump out the
solvent until air comes through the gun.
10. Repeat
the procedure with clean solvent, if needed.
11. Release
the trigger and lock the gun trigger safety
.
12.
Close the master air valves (A,14). Fully close the
pump air regulator (8a).
13.
Open the drain valve (26), having a container
ready to catch the drainage.
14.
Remove the suction hose from the solvent and
place it in an empty container
.
15.
Clean the filter screen, air cap and spray tip sepa
-
rately
. Reinstall the filter screen.
16.
Thoroughly clean the inside and outside of the
suction tube
.
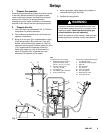
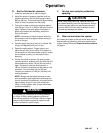
Fig. 6
C
8b
8a
04072
KEY
A Bleed-type
master air valve
3
Air-assisted airless spray gun
5
Fluid filter
8a
Pump air regulator
8b
Gun air regulator
14
Bleed–type air valve
26
Filter drain valve
3
14
5
26
A