


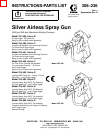


6 308-236
Installation/Operation
How to Use the Gun
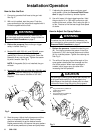
1. Connect
a grounded fluid hose to the gun inlet.
See Fig. 2.
2.
With no tip installed, start the pump. Flush the
pump according to the instructions supplied with it.
Prime the system with the fluid.
WARNING
T
o reduce the risk of serious injury whenever you
are instructed to relieve pressure, always follow the
Pressure Relief Procedure
on page 5.
3.
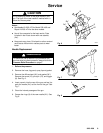
Relieve the pressure.
Be sure the gun trigger
safety is locked. See Fig. 1.
4.
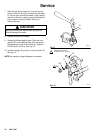
Models 235–460, 235–461, and 235–462:
screw
the tip guard (1) and install the tip (A) and the
gasket (2d) in the nut of the tip guard. Screw the
assembly firmly onto the gun. T
ighten the assem
-
bly with a wrench. See Fig. 2.
NOTE:
If the gasket (2d) is not installed, the gun
will leak.
5.
Models 235–463, 235–464, 238–591, 236–531 and
238–966:
install the SwitchT
ip (16) and the tip
guard (17). See manual 308–644 or 307–991,
supplied.
Fig. 2
01473
1
A
2d
17
16
6.
Start the pump. Adjust the fluid pressure until the
spray is completely atomized. Use the lowest
pressure necessary to get the desired results.
Higher pressure may not improve the spray pattern
and will cause premature tip wear and pump wear
.
7.
If adjusting the pressure does not give a good
spray pattern, follow the
Pressure Relief Proce
-
dure
on page 5 and then try another tip size.
8.
Use a full-open, full-close triggering action. Hold
the gun about 14 in. (350 mm) from and at right
angles to the work surface. Don’t swing the gun in
an arc. Practice to find the best length and speed
of stroke.
How to Adjust the Spray Pattern
WARNING
To
reduce the risk of serious injury whenever you
are instructed to relieve pressure, always follow the
Pressure Relief Procedure
on page 5.
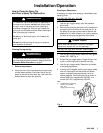
1.
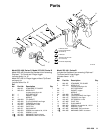
Relieve the pressure. Loosen the retaining nut
(B). T
urn the tip guard so the groove in the tip is
horizontal (C) for a horizontal pattern and vertical
(A) for a vertical pattern. T
ighten the retaining nut.
See Fig. 3.
2.
The orifice of the spray tip and the angle of the
spray pattern determines the coverage and the
size of the pattern. When more coverage is
needed, use a larger spray tip rather than
increasing the fluid pressure.
CAUTION
The openings in the tip guard reduce paint buildup on
the tip guard while spraying. Any damage to the
sharp edges of the openings causes paint to collect
at that area. Never hang the gun by the tip guard.
7658A
01472A
Fig. 3
A
B
C
KEY
ATip
guard shown in position for
vertical spray pattern
B
Retaining nut
CT
ip guard shown in position for
horizontal spray pattern