


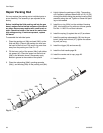

Gun Operation Troubleshooting
26 312900C
Gun Operation Troubleshooting
NOTE: Check all possible remedies in the Troubleshoot-
ing Chart before disassembling the gun
.
Electric Shock Hazard
Installing and servicing this equipment requires
access to parts which may cause an electric shock or
other serious injury if the work is not performed prop-
erly. Do not install or repair this equipment unless you
are trained and qualified.
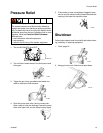
Pressurized Equipment Hazard
To reduce the risk of an injury, follow the Pressure
Relief procedure on page 19 whenever you are
instructed to relieve the pressure.
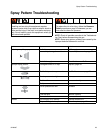
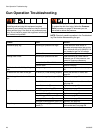
Problem Cause Solution
Excessive spray fog. Atomizing air pressure too high. Close restrictor valve some, or
decrease air pressure as low as pos-
sible; minimum 40 psi (0.28 MPa, 2.8
bar) needed at gun for full voltage.
Fluid too thin. Increase viscosity.
“Orange Peel” finish. Atomizing air pressure too low. Open atomizing air valve more or
increase gun air inlet pressure; use
lowest air pressure necessary.
Poorly mixed or filtered fluid. Remix or refilter fluid.
Fluid too thick. Reduce viscosity.
Fluid leaks from the fluid packing
area
Worn packings or rod. Replace packings or rod; see page
30.
Air leaks from the front of the gun Air valve (21) is not seating properly. Clean and service air valve; see
page 34.
Fluid leakage from the front of the
gun
Worn or damaged packing rod (26). Replace; see page 30
Worn fluid seat. Replace fluid nozzle and/or needle;
see page 28.
Loose fluid nozzle (7). Tighten; see page 28.
Damaged nozzle o-ring (7b). Replace; see page 28.
Gun does not spray Low fluid supply. Add fluid if necessary.
Damaged air cap (9). Replace; see page 28.
Dirty or clogged fluid nozzle (7). Clean; see page 28.
Damaged fluid nozzle (7). Replace; see page 28.
Damaged fluid adjustment valve (25). Replace; see page 34.
Dirty air cap Misaligned air cap (9) and fluid
nozzle (7).
Clean fluid buildup off air cap and
fluid nozzle seat; see page 28.