


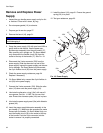

Gun Repair
28 312900C
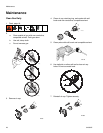
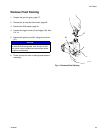
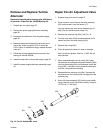
Replace Air Cap/Nozzle
1. Prepare gun for repair page 27.
2. Remove probe.
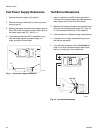
3. Remove the retaining ring (27) and air cap (9). See
F
IG. 13.
4. Point gun up and squeeze trigger while removing
the fluid nozzle (7) assembly with the multi-tool (37).
Fig. 13. Replace Air Cap/Nozzle
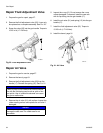
Use non-silicone grease, Part No. 111265, on the
small o-ring (7b). Do not over-lubricate. Do not lubri-
cate the contact ring (7a).
5. Lightly lubricate the o-ring (7b). Install it and the
contact ring (7a) on the nozzle (7).
Make sure the fluid needle (29) is finger- tight (page
28).
6. Trigger gun while installing the fluid nozzle (7) with
the multi-tool (37). Tighten until the fluid nozzle
seats in the gun barrel (1/8 to 1/4 turn past
hand-tight).
7. Install the air cap (9) and retaining ring (27). Make
sure the u-cup (27a*) is in place with the lips facing
forward.
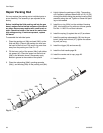
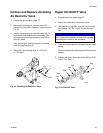
Replace Fluid Needle
1. Prepare the gun for repair page 27.
2. Remove the air cap and nozzle, page 28.
3. Unscrew the fluid needle (29). Hold the packing rod
end (26) to prevent it from turning, F
IG. 13.
4. Apply low-strength (purple) Loctite
®
or equivalent
thread sealant to the fluid needle and packing rod
threads. Install the fluid needle finger-tight. Do not
overtighten.
5. Install the fluid nozzle and air cap, page 28.
NOTICE
Hold the front end of the gun up and trigger the
gun while removing the nozzle to help drain the
gun and prevent any paint or solvent left in the gun
from entering the air passages.
Fire, Explosion, and Electric Shock Hazard
The nozzle contact ring (7a) is a conductive contact
ring, not a sealing o-ring. To reduce the risk of spark-
ing or electric shock, do not remove the nozzle contact
ring (7a) except to replace it and never operate the
gun without the contact ring in place. Do not replace
the contact ring with anything but a genuine Graco
part.
27
9
7
7a
7b
27a*
37
ti12726
29
26