


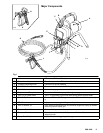

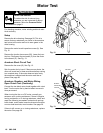

308-548 13
Flushing
When to Flush
1. Before
using a new sprayer:
flush out the oil
which was left in to protect pump parts.
Before using water-base paint:
flush with min
-
eral spirits followed by soapy water
, and then a
clean water flush.
Before using oil-base paint:
flush with mineral
spirits only
.
2. Changing colors:
flush with a compatible solvent
such as mineral spirits or water
.
3. Changing from water-base to oil-base paint:
flush with warm, soapy water
, and then mineral
spirits.
4. Changing from oil-base to water-base paint:
flush with mineral spirits, then warm, soapy water
,
and then a clean water flush.
5. Storage after using water-base paint:
flush with
water and then mineral spirits. Leave the system
filled with mineral spirits. Relieve pressure. Leave
the drain valve open.
Storage after using oil-base paint:
flush with
mineral spirits. Relieve pressure. Leave the drain
valve open.
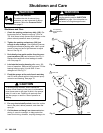
CAUTION
Never
allow water to freeze in the pressure control.
Doing so prevents the sprayer from being started
and may cause serious damage. Push the water out
with mineral spirits.
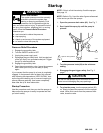
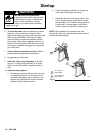
6. Startup
after storage.
Before using water-base
paint, flush out the mineral spirits with soapy water
and then clean water
. When using oil-base paint,
flush out the mineral spirits with the paint.
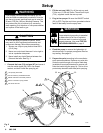
How to Flush
1. Follow
the
Pressure Relief Procedure
on
page 9.
2.
Remove the spray tip and clean it separately
.
3.
Pour one-half gallon (2 liters) of compatible solvent
into a grounded metal flushing pail. Put the suction
hose in the pail.
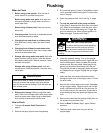
4.
Open the pressure drain valve. See Fig. 4, page
7.
5. To save the paint still in the pump and hose,
follow Step 6, except put the drain tube in the paint
pail. When solvent appears, close the drain valve.
Put the drain tube in the flushing pail. T
rigger the
gun into the paint pail. When solvent appears, re
-
lease the trigger
. Continue with Step 6.
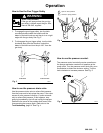
T
o reduce static sparking and splashing,
always remove the spray tip from the
gun, and hold a metal part of the gun
firmly to the side of a grounded metal pail when
flushing.
WARNING
FIRE AND EXPLOSION HAZARD
6.
Lower the pressure setting. T
urn on the sprayer
.
Maintaining metal-to-metal contact, trigger the gun
into the flushing pail. Slowly increase the sprayer
pressure until the pump starts. Keep the gun trig
-
gered until the solvent flows freely from the gun.
Circulate the solvent to thoroughly clean the spray
-
er
. Release the gun trigger. Engage the gun trigger
safety.
7.
Open the drain valve and circulate the solvent
through the drain tube to thoroughly clean it. Close
the drain valve.
8.
Remove the suction hose from the pail. Disengage
the gun trigger safety
. T
rigger the gun and run the
pump a few seconds to push air into the hose. Do
not run the pump dry for more than 30 seconds to
avoid damaging the pump packings! Relieve pres
-
sure.
9.
Remove and clean the inlet strainer
. Wipe paint of
f
the suction hose and drain tube.
10.
Refer to
When To Flush,
Step 1 again. Relieve
pressure.
11.
Leave the drain valve open until you use the
sprayer again.