


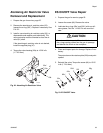

Repair
309292S 31
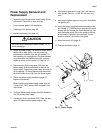
Power Supply Removal and
Replacement
• Inspect the gun handle power supply cavity for dirt
or moisture. Clean with a clean, dry rag.
• Do not expose gasket (10) to solvents.
1. Prepare gun for service, page 25.
2. Remove the barrel (16), page 30.
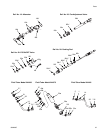
3. Grasp the power supply (18) with your hand. With a
gentle side to side motion, free the power sup-
ply/alternator assembly from the gun handle (17),
then carefully pull it straight out. On Smart Models
only, disconnect the flexible circuit (59) from the
socket at the top of the handle (17). See F
IG. 17..
4. Disconnect the 3-wire connector (GG) from the
power supply. Slide the alternator up and off the
power supply. Inspect the power supply and alterna-
tor for damage. On Smart Models only, disconnect
the 6-pin flexible circuit (59) from the power supply.
5. Check the power supply resistance, page 19.
Replace if necessary.
Before installing the power supply, make sure the
o-rings (18a*, 19a*), spring (18b), and pads (19e)
are in place.
6. On Smart Models only, connect the 6-pin flexible cir-
cuit (59) to the power supply.
7. Connect the 3-wire connector (GG). Slide the alter-
nator (19) down onto the power supply (18).
8. Lubricate the alternator o-ring (19a*) with non-sili-
cone grease, Part No. 111265. Do not over-lubri-
cate.
9. Lubricate the power supply o-ring (18a*) with dielec-
tric grease (40).
10. Insert the power supply/alternator assembly in the
gun handle (17). Make sure the ground strips make
contact with the handle. On Smart Models only, con-
nect the flexible circuit (59) to the socket at the top
of the handle. Push the 6-pin connector into the
socket to ensure it is properly connected.
11. Install the barrel (16), page 30.
12. Test gun resistance, page 18.
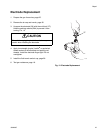
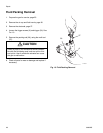
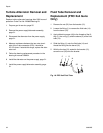
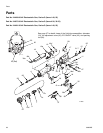
Fig. 17. Power Supply
CAUTION
Be careful when handling the power supply (18) to
avoid damaging it.
ti1505c
19
*18a 18b
10*
19a*
59
GG
18
19e
17